This is a tutorial on "How to make Trees"
I equate adding trees to a gaming table like adding candles on a birthday cake,it just doesn't look complete without the trees.
Hope this tutorial is helpful.
The following images show examples of a number of different completed trees,they range in height from 22 cm to 9 cm and I use them for 28mm scale models but are suitable for other scales.
 |
| Tree in Autumn |
 |
| Tree in early Autumn |
 |
| 6 bare winter trees |
 |
| Purchase wire from the hardware store, the wire I used is 0.09mm thick. |
 |
Using wire cutter, cut 8 x 44 cm lengths of wire.
Note: the height of the trees can be varied by adjusting the lengths of the wire. |
 |
| Bend the wire in half. |
 |
Place a old paint brush in the middle of the wire and start twisting the wire 4 or 5 times.
"As a side note they are many great videos that people have shared that run thru this bending process."
|
 |
| Pull out the brush and separate the wire into 4 equal sections. |
 |
| Grab 2 sections of wire and twist together about 4 or 5 times, do the same to the other 2 sections of wire, this will create 4 section each with 4 wires. |
 |
| Separate each section of 4 wires in half and start to twist each section of wires. |
 |
| Now you will be left with each wire extension only having 2 wires on each section. Continue to twist each of the 2 wires a numbers of times. |
 |
| With the help of pliers pull out each loop section at the base of the wire tree, so that they lie flat on the mat. |
 |
| using wire cutters cut each loop in the middle. |
 |
| Twist each of the wires together. |
 |
Alternately you can use the same method of wire bending for the upper portion of the tree to create a more detailed root system. "your choice''
Once you get the hang of twisting the wire, you will find it does not take long to complete a tree and the added bonus its a good stress release.
|
 |
The tree supporting itself on the mat.
I use large mud guard washers for the base of the tree, these are much thinner and wider that standard washers.
|
 |
| Superglue the tree onto the washer and leave to set. |
 |
Using Acrylic gap sealant coat the entire tree and base using a cheap paint brush.
The Gap filler has a short setting time so only pour out small portions at a time.
Using the paint brush apply the gap filler and apply a thin coat of filler on all the metal surfaces.
Helpful hint, is to frequently wash your brush to avoid the filler setting on the bristles.
|
 |
| First thin coat completed, allow to dry. |
 |
| Apply another thin coat of Acrylic gap filler and allow to set. |
 |
Next step is to reproduce the finer branches.
This is done with the use of Rubberized Horsehair and a glue gun.
(I recommend using Rubberized Horsehair as apposed to using Coco fiber as it is more robust.)
|
 |
| Using a hot glue gun apply glue along the branch. |
 |
| Pull off a piece of Horsehair and place in on-top of the glue. |
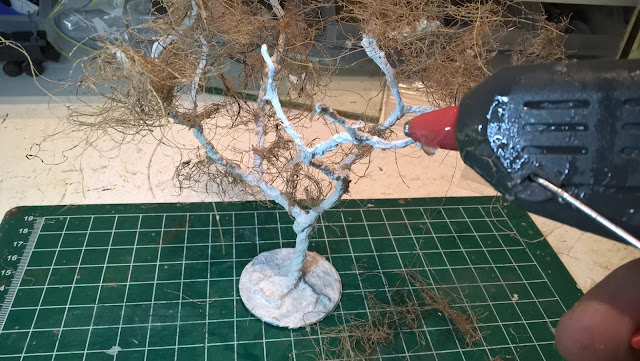 |
Continue this process till you are happy with the amount of fine branches on the tree.
Hint: you don't need to go crazy and cover all the branches with the fiber, space out the fiber.
Also make sure you place some fiber on the end tips of the branches.
You can also use scissors to trim stray hairs.
Again......Don't be afraid to leave spaces, remember less is more.
|
 |
| Undercoat with Rustoleum black primer. |
 |
Allow to dry and paint the large branches,roots and base with the following colours listed below.
When painting the trees at this stage, it will get a bit fiddly as you progress up into the thinner branches with the fiber, it does not have to be perfect as a lot of the surface will be covered by flock.
|
 |
Image of a deciduous tree.
The paints I used are Vallejo Model colour flat earth,Grey Green and Vallejo game colour Stone wall grey.
Now there is no set method or order of colours to apply, so you can experiment.
example:
- use the Stone wall grey to wet brush (dry brushing but with more paint on the brush) the whole tree allowing the black primer .
- highlight most areas with the Grey green
- limited highlight of certain areas with flat earth.
Its up to you if you want the tree to look more greyish use the Stone wall grey as the base colour, or if a browner colour is desired use the flat earth as a base coat.
|
 |
| This is a tree in winter (no leaves will be added) with a more greyish look. |
 |
| Prepare a area with your PVA glue, brush, coarse flock and plastic container to catch any excess flock |
 |
Using a large flat brush I apply the PVA glue onto the fine brushes of the tree.
I don't use a spray can adhesive as I want to be able to control the areas, I want to attach flock on the branches.
|
 |
Apply the coarse flock onto the tree, till the whole tree is covered with flock.
I then shake off the excess.
You can use different colours of flock as well,darker flock as a base, lighter coloured flock as a highlight.
|
 |
| Using the back of a paint brush I separate and free up the flock so that its not a big mass, you want to create spaces between the branches and the flock. |
 |
| Image shows the separation. |
 |
| Coat the base with PVA glue. |
 |
| Apply some bits of flock that were used on the tree to the base. |
 |
| Complete the coverage of the base with fine flock to match your gaming mat. |
 |
Completed tree.
Allow the PVA glue to set and knock on the underside of the base a couple of times to separate any loose flock material. |
 |
I apply a generous coat of this product to fix the flock on the branches as opposed to spraing the flock with watered down PVA glue. |
 |
I recommend making one of these model holders as it makes life easier while modelling the trees. clink on the link for more info: Modelling tip #1
|
 |
| Here is where I store my trees, there a number of trees missing as they are on the gaming table. |
Here are two of my gaming tables that where fought over by the US and Germans, the inclusion of trees do help add realism to the tables.
Cheers John


