CLINK HERE FOR A COMPLETE INDEX TO ITEMS ON THIS BLOG

Showing posts with label PAINTING TUTORIAL. Show all posts

Wednesday, 20 April 2022

LATE WAR GERMAN INFANTRY PAINTING GUIDE and GERMAN GUARDS

This was a spur of the moment project I did, this long weekend, I woke up in the  morning with a crazy idea that I needed to build some guards for my Germans even thought I was already working away on my US Marines. 

I had been working on my US Marines for a while and sometimes, its good to work on another project in between, to get the inspirational juices going again.

I raided my left over parts bin and selected four Warlord games plastic German torsos and proceeded converting their body parts into a guard like posture.

These troopers will be utilised for specific Chain of Command scenarios, such as the ones found in the TooFatLardies specials.  

I also included a painting guide for Late war German Infantry.


Completed conversions figures ready for priming. 
Both of these figures had their right arms sliced in a couple of area to reposition them grasping the rifle and the base of the right figure was trimmed at the base connection to the shoulder and Green stuff putty added. Rifle straps were added with Milliput.
Back view of the figures show how the right legs with sliced and repositioned with the help of some Green stuff putty.
These two figures had some adjustments to the area which connects the arm to the shoulder and again Green stuff putty used to remodel the shoulder area.
The right figure also had his right legs sliced and repositioned.
Primed Black
Painted figure with flock added to the bases, forgot to paint the white stripes on collars of the first two figures, which have been added.
I had no gas mask canisters into my parts bin so the figures are without them.
Changing of the guards at a road check station.

LATE WAR GERMAN INFANTRY PAINTING GUIDE

The painting sequence I use for the German infantry is as follows:
  • Black prime 
  • paint the figures' base
  • paint  flesh parts with flesh base colour and apply wash to flesh parts
  • paint the uniform completely 
  • using Black Grey or black primer to go over any areas that you may have covered while painting the uniform
  • paint the base coat for the Helmet, Gatters, boots, Bread bag, gas mask canister, water bottle etc and then coat with the wash and move onto  finishing painting each item.  
  • finish off the flesh parts.
  • optional to use VMC Flat Earth with a small dry brush to very lightly dry brush areas that would normally rub against the ground if the figure was in a prone position, elbows, knees. 
  • once all the painting is finished coat the model with a gloss enamel varnish 
  • apply a  couple of coats of Matt varnish
  • apply flock to the figures' base.
Just a note this is a rough guide I used to paint my figures but you may want to alter the ratios as you see fit as you can note from the above image the German uniform varied in colour.


HELMET
Base: VMC German Dark Green 979
Wash: Agrax Earthshade
1st Highlight: Dry Brush: VMC German Dark Green 1:1 VMC Iraqui Sand
2nd Highlight: Dry Brush: add a bit more VMC Iraqui Sand 
Details: 
Top of the helmet add tiny wear spots with VMC Black Grey,  
Around the sharp rim of the helmet add tiny amount of gunmetal to simulate wear.


UNIFORM
Base: VMC German FieldGrey 830
Wash: Agrax Earthshade
1st Highlight: VMC German FieldGrey 830 avoiding cresses 
2nd Highlight: VMC Green Grey 
3rd Highlight: continue by adding  a touch of VMC Iraqui Sand to the Green Grey
Optional highlight: very light drybrushing with VMC Earth targeting the knees, elbows, edges of uniform near the waist , can also some top portions of the uniform to give the uniform a slight brown tinge.


GATTERS 
Base: VMC Khaki 
Wash: Agrax Earthshade
1st Highlight: VMC Khaki avoiding cresses 
2nd Highlight: VMC Khaki  1:1 VMC Iraqui Sand


BOOTS
Base: VMC Mahogany Brown 1:1 VMC Beige Brown 
Wash: Agrax Earthshade
1st HighlightVMC Mahogany Brown 1:1 VMC Beige Brown avoiding cresses 
2nd HighlightVMC Mahogany Brown ,VMC Beige Brown, VMC Iraqui Sand, 1:1:1


BREAD BAG
Base: VMC Green Ochre
Wash: Agrax Earthshade
1st Highlight VMC Green Ochre avoiding cresses
2nd Highlight: VMC Green Ochre 1:1 VMC Iraqui Sand
3rd Highlight: add a bit more VMC Iraqui Sand to the above mix

WATER BOTTLE

Base: VMC Beige Brown 
Wash: Agrax Earthshade
1st Highlight: VMC Beige Brown
2nd Highlight: VMC Beige Brown 1:1 VMC Iraqui Sand
3rd Highlight: add a bit more VMC Iraqui Sand to the above mix


GASMASK/ DRINKING CUP/ MESS TIN
Base: VMC German Dark Green 979 
Wash: Agrax Earthshade
1st HighlightVMC German Dark Green 979
2nd Highlight: VMC German Dark Green 979  1:1 VMC Iraqui Sand
3rd Highlight add random spots of  VMC Gun Metal to simulate wear 


WEBBING
 
Base: VMC Black Primer
1st Highlight: VMC Black Grey  with a touch of VMC Iraqui Sand
2nd Highlight: VMC Black Grey  with a touch of VMC Iraqui Sand
3rd Highlight:  add a bit more VMC Iraqui Sand to the above mix


Cheers John 


Friday, 25 May 2018

LATE WAR GERMAN VEHICLE PAINTING GUIDE and my GERMAN ARMOURED ARSENAL

Here is a tutorial for painting  German tanks in the later years of the war with brushes.
Hope its helpful.
All these tanks are 28mm.
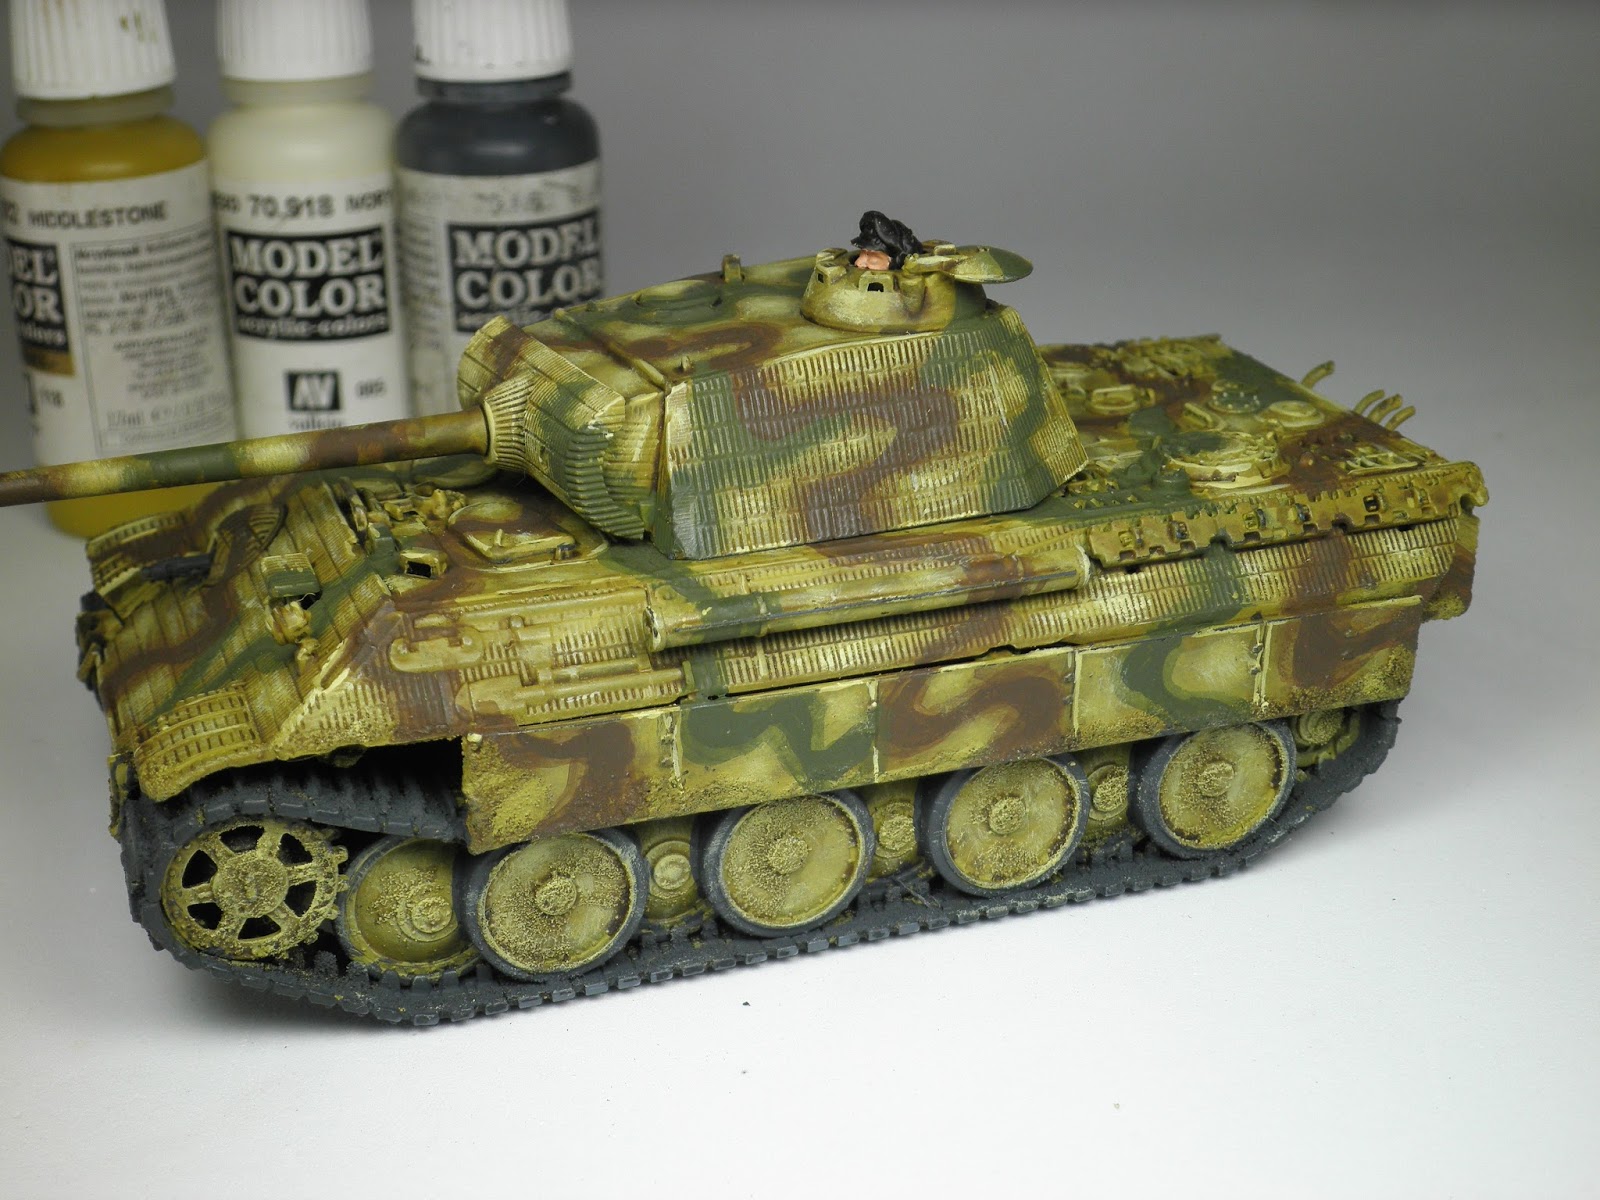
Completed 2 Panther tanks.

German  Tanks include 2 x Panthers, Tiger, 2 x Panzer IV, 1 x Panzer III N and Luchs.


 2 x  Sd.Kfz 251 D halftrack, 1 x Sd.Kfz 250/9 Neu, 1 x 1 x Sd.Kfz 250/1 Neu, 1 x Puma  and a Schwimmwagon.


Tiger tank (Italeri 1:56 scale plastic kits,)


Rubicon  plastic model

The tank models I used were the Italeri 1:56 scale plastic kits, "nice little models".
 Image shows the Panther assembled with the lower portion of the vehicle  coated with fine pumice. follow the link for "How to simulate mud and grit.

Coated with Rustoleum Black Flat Primer.

2 thin coats of Vallejo Model colour Middlestone where applied with a brush.

Apply Agrax Earthshade wash over the whole of the vehicle.

Use a older brush , one you would normally use for dry brushing (hopefully with more bristles than  my  one in the image, I picked up the wrong brush for the photo) .
Use a old brush with short bristles  to apply the base coat (Middlestone).
Apply VMC Middlestone paint on the brush then wipe on a paper towel to remove some of the paint.
In a very light circular motion start applying the paint in the middle of the panels and work out towards the edges as desired.
I recommend practicing this Technic on the underside of the tank first.
You should be aiming for the edges of the paint work to fade into and blend with the already applied base coat that has been washed over with Agrax, Earthshade.


Red squiggles show the areas to target with the Middlestone, note that I have avoided going over the Zimmerit.

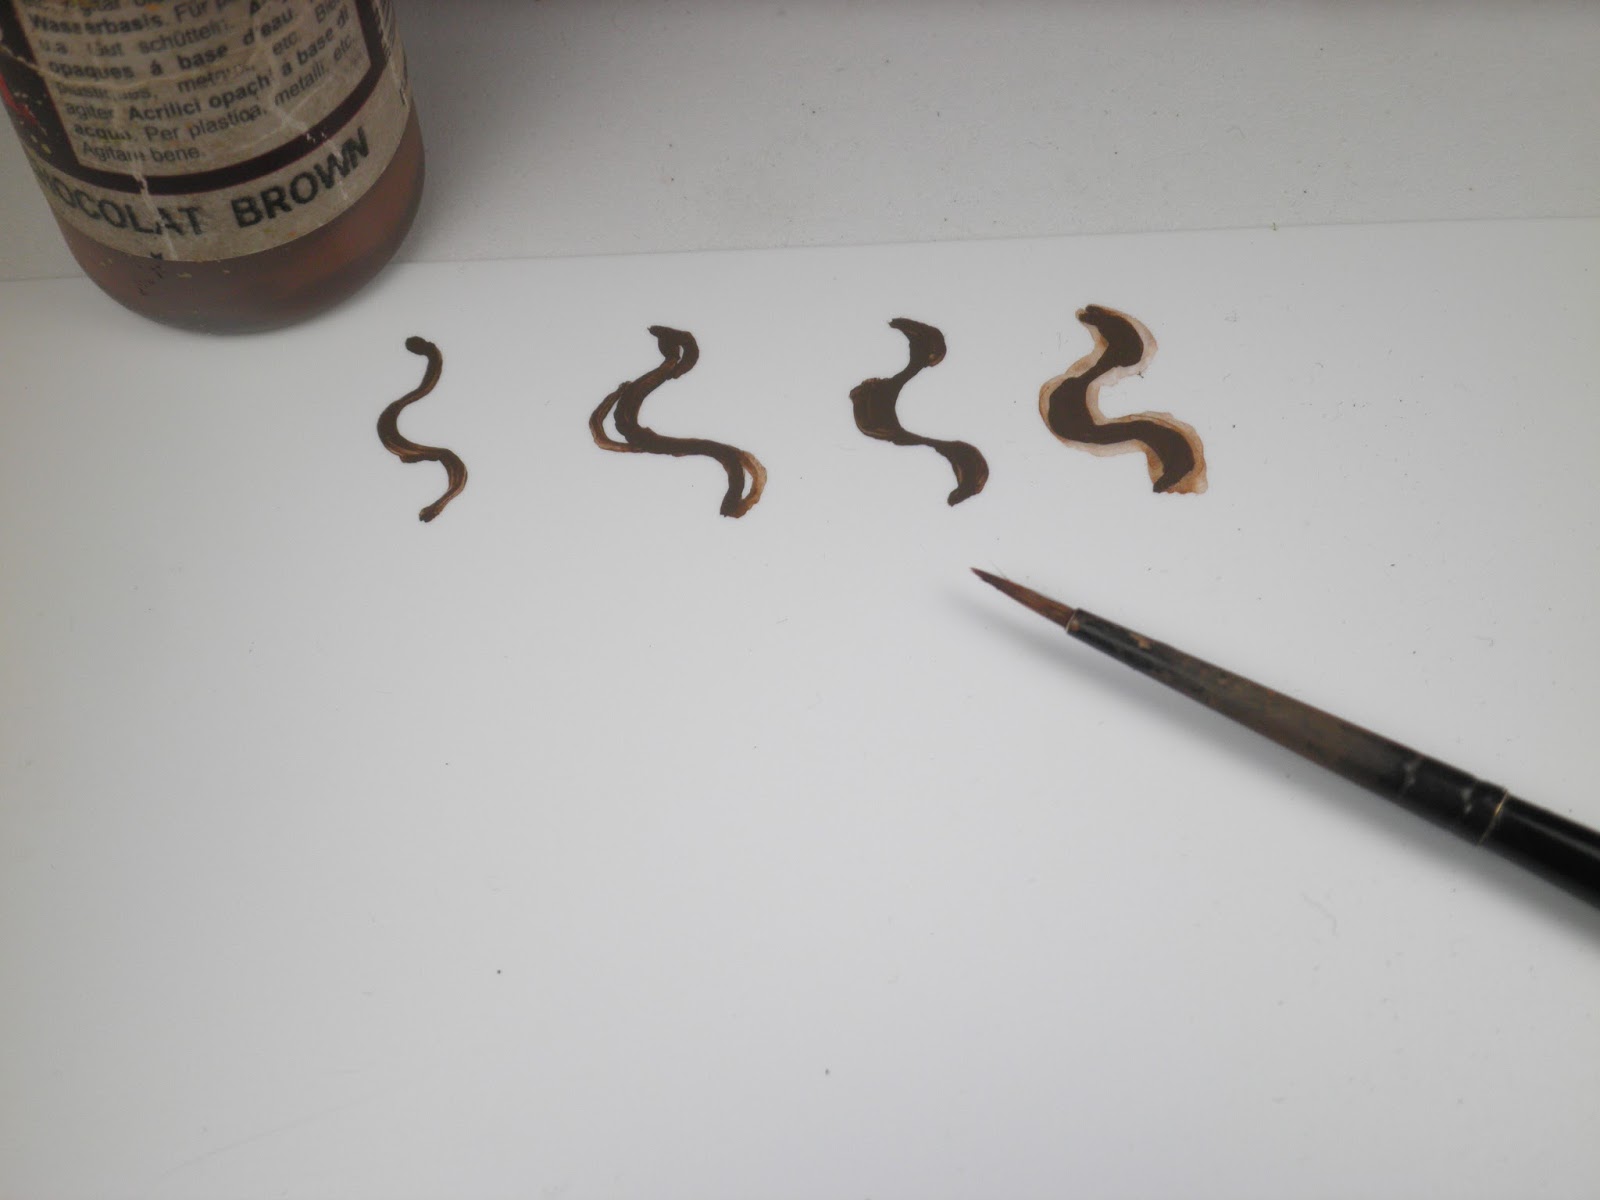
Next step is to paint in the brown camo lines using Vallejo Model Colour Chocolate Brown.

As you can see I have not made a great effort in blending the Middlestone on the Panther  as most of the vehicle is covered with  Zimmerit but I do recommend taking care to blend Middlestone on vehicles without Zimmerit ,as can be seen with the Panzer III N below.

Following these easy steps, will help with applying the camo on the tank.
1. paint a thin curvy line.
2. enlarge the curves by painting another line just on the curves.
3. fill in 
4. thin down the paint to apply a wash over the camo,
 you can vary the thickness of the wash as you please.
Note: Its up to you how thick or thin you want the camo lines to be.
and you can also chose not to go to step 4 and make the camo more define.

Once dry use VMC Reflective Green to paint in the green camo on the vehicle.


At this stage I highlight the previously painted VMC Middlestone circular areas in the middle and lightly ran my brush over the areas of Zimmerit that have Middlestone colour.
Be careful not to block out the detail of the Zimmerit.
I used a mix of VMC Middlestone and VMC Ivory ,1:1 ratio.

Using a mix of  VMC Middlestone and VMC Ivory 1:1 ratio, apply a very thin  highlight  on the edges of the tank but only over the Middlestone base colour.
(you can further highlight the middle of these already highlighted areas with a mix of 1:2 Middlestone/Ivory if desired)
I like to leave the brown and green camo areas as they are and don't go over them with the Middlestone /Ivory highlight. 
Using VMC Black Grey paint the tracks, tools, MG, tow line etc.

Paint the handles of the tools using VMC Brown Beige, highlight with 1: 1 ratio VMC Brown Beige and VMC skin base.with a further highlight by increasing the ratio of VMC skin base.

Wash the tracks and some of the lower portions of the panel where pumice was added with a thin wash of VMC Earth.
Once dry, use a brush with VMC Earth to pickout and highlight some areas over the Earth wash.
Lightly go over the tracks with VMC Black Grey to highlight them taking care not to eliminate the earth colour that is already on the tracks.
To finish off the tracks use Citadel Leadbelcher to give a hint of highlight to some of edges of the tracks.( add a bit of this colour to any metal parts)

Add a bit of rust to the Tracks or metal tow cable using VMC Calvary Brown and around any hatches,hinges and a few vertical thin streaks on the vehicles as desired.

Add the transfers.
Used to add some wear areas on the vehicle use a very thin pointed brush to place  tiny spots using VMC Black Grey , I also like to go over the insignias as well.


The last task to do, use Citadel Thraka ink wash to apply vertical thin random streaks over the vehicle.

Rear view of the Panther tanks.

Panzer III N


Cheers John 

Tuesday, 17 April 2018

LATE WAR BRITISH VEHICLE PAINTING TUTORIAL


In preparation  for my first campaign game in a few weeks (Operation Martlet) I finally finished painting this Troop of Sherman tanks complete with a Sherman Firefly, for those of you who can recall I actually put these models together back in 2015 link.
I also took the opportunity to put together a painting tutorial. 
As I do all my painting with a brush I tried to mimic the effects that one would achieve with a air brush.


Italeri 28mm Sherman with a bit of conversion work.


Coated with Black spray primer.


Applied 2 x coats of base colour paint.
This is a mix of Vallejo model colour Olive Grey and Russian Uniform 50:50 mix placed in a empty Vallejo paint bottle. 


Once dried, coat the whole surface with a wash  of Agrax Earthshade.


An alternative to coating the whole surface is to pin wash around all the hatches and edges as shown in the image above right.

Using  Vallejo Model colour Calvary Brown mixed with some Citadel Lahmian Medium, pin wash as per previous image above as a guide.

 Use a old brush with short bristles to apply the base coat mix .
Apply paint on the brush then wipe on a paper tower to remove some of the paint .
In a very light circular motion start applying the paint in the middle of the panel and work out towards the edges as desired.

I recommend practicing this Technic on the underside of the tank .
You should be aiming for the edges of  paint work to fade into and blend with the already applied base coat that has been washed with the Agrax Earthshade..


Like this leaving a darker shade intact.


Once dry, repeat the process with the addition of Iraqui Sand 1:2 ratio with the base coat but use a smaller brush.


This time  stopping short of your previous circular applied base coat.
If desired, mix Iraqui sand 1:1 ratio with base coat and repeat the step but make the circle smaller.


Use Vallejo Model colur Black Grey to paint all the little bits on the tank eg: boxes, tarps, tools, cables, helmets and of course the tracks.


Apply a wash of Vallejo Model colour Earth onto the tracks, wheels and lower edges of the vehicle. 
Once dry  build up the Earth colour with the use of  thin brush applying  thicker as desired.


Mix up a mix of the base coat and Iraqui sand and highlight the wheels  and wheel mounting.
Use Citadel leadbelcher to highlight metal tips on the track.
Apply a few tiny wear spots on the tank using Vallejo Black Grey with a fine tipped brush.
 Minimize these wear areas as the Shermans where shot up pretty quickly but the Allies had  an abundance   supply of new tanks behind the front line,  ready to be re-crewed by the tankers who lose their tanks.


Apply any transfers , I painted the triangle marking on the turret  with flat red.
Apply vertical random streaks marks using Citadel Tharaka Green wash.


Tool handles are painted with Beige Brown.
Highlighted with a mix of Beige Brown and skin base.


Firefly ready for action.

Hope to be posting a tutorial on painting Late war German tanks soon.


cheers John