CLINK HERE FOR A COMPLETE INDEX TO ITEMS ON THIS BLOG

Showing posts with label BRITISH LATE WAR WW II 28 MM. Show all posts

Tuesday, 17 April 2018

LATE WAR BRITISH VEHICLE PAINTING TUTORIAL


In preparation  for my first campaign game in a few weeks (Operation Martlet) I finally finished painting this Troop of Sherman tanks complete with a Sherman Firefly, for those of you who can recall I actually put these models together back in 2015 link.
I also took the opportunity to put together a painting tutorial. 
As I do all my painting with a brush I tried to mimic the effects that one would achieve with a air brush.


Italeri 28mm Sherman with a bit of conversion work.


Coated with Black spray primer.


Applied 2 x coats of base colour paint.
This is a mix of Vallejo model colour Olive Grey and Russian Uniform 50:50 mix placed in a empty Vallejo paint bottle. 


Once dried, coat the whole surface with a wash  of Agrax Earthshade.


An alternative to coating the whole surface is to pin wash around all the hatches and edges as shown in the image above right.

Using  Vallejo Model colour Calvary Brown mixed with some Citadel Lahmian Medium, pin wash as per previous image above as a guide.

 Use a old brush with short bristles to apply the base coat mix .
Apply paint on the brush then wipe on a paper tower to remove some of the paint .
In a very light circular motion start applying the paint in the middle of the panel and work out towards the edges as desired.

I recommend practicing this Technic on the underside of the tank .
You should be aiming for the edges of  paint work to fade into and blend with the already applied base coat that has been washed with the Agrax Earthshade..


Like this leaving a darker shade intact.


Once dry, repeat the process with the addition of Iraqui Sand 1:2 ratio with the base coat but use a smaller brush.


This time  stopping short of your previous circular applied base coat.
If desired, mix Iraqui sand 1:1 ratio with base coat and repeat the step but make the circle smaller.


Use Vallejo Model colur Black Grey to paint all the little bits on the tank eg: boxes, tarps, tools, cables, helmets and of course the tracks.


Apply a wash of Vallejo Model colour Earth onto the tracks, wheels and lower edges of the vehicle. 
Once dry  build up the Earth colour with the use of  thin brush applying  thicker as desired.


Mix up a mix of the base coat and Iraqui sand and highlight the wheels  and wheel mounting.
Use Citadel leadbelcher to highlight metal tips on the track.
Apply a few tiny wear spots on the tank using Vallejo Black Grey with a fine tipped brush.
 Minimize these wear areas as the Shermans where shot up pretty quickly but the Allies had  an abundance   supply of new tanks behind the front line,  ready to be re-crewed by the tankers who lose their tanks.


Apply any transfers , I painted the triangle marking on the turret  with flat red.
Apply vertical random streaks marks using Citadel Tharaka Green wash.


Tool handles are painted with Beige Brown.
Highlighted with a mix of Beige Brown and skin base.


Firefly ready for action.

Hope to be posting a tutorial on painting Late war German tanks soon.


cheers John 


Tuesday, 14 March 2017

CROMWELL TANK + SCRATCH BUILT CENTAUR TURRET 28 mm


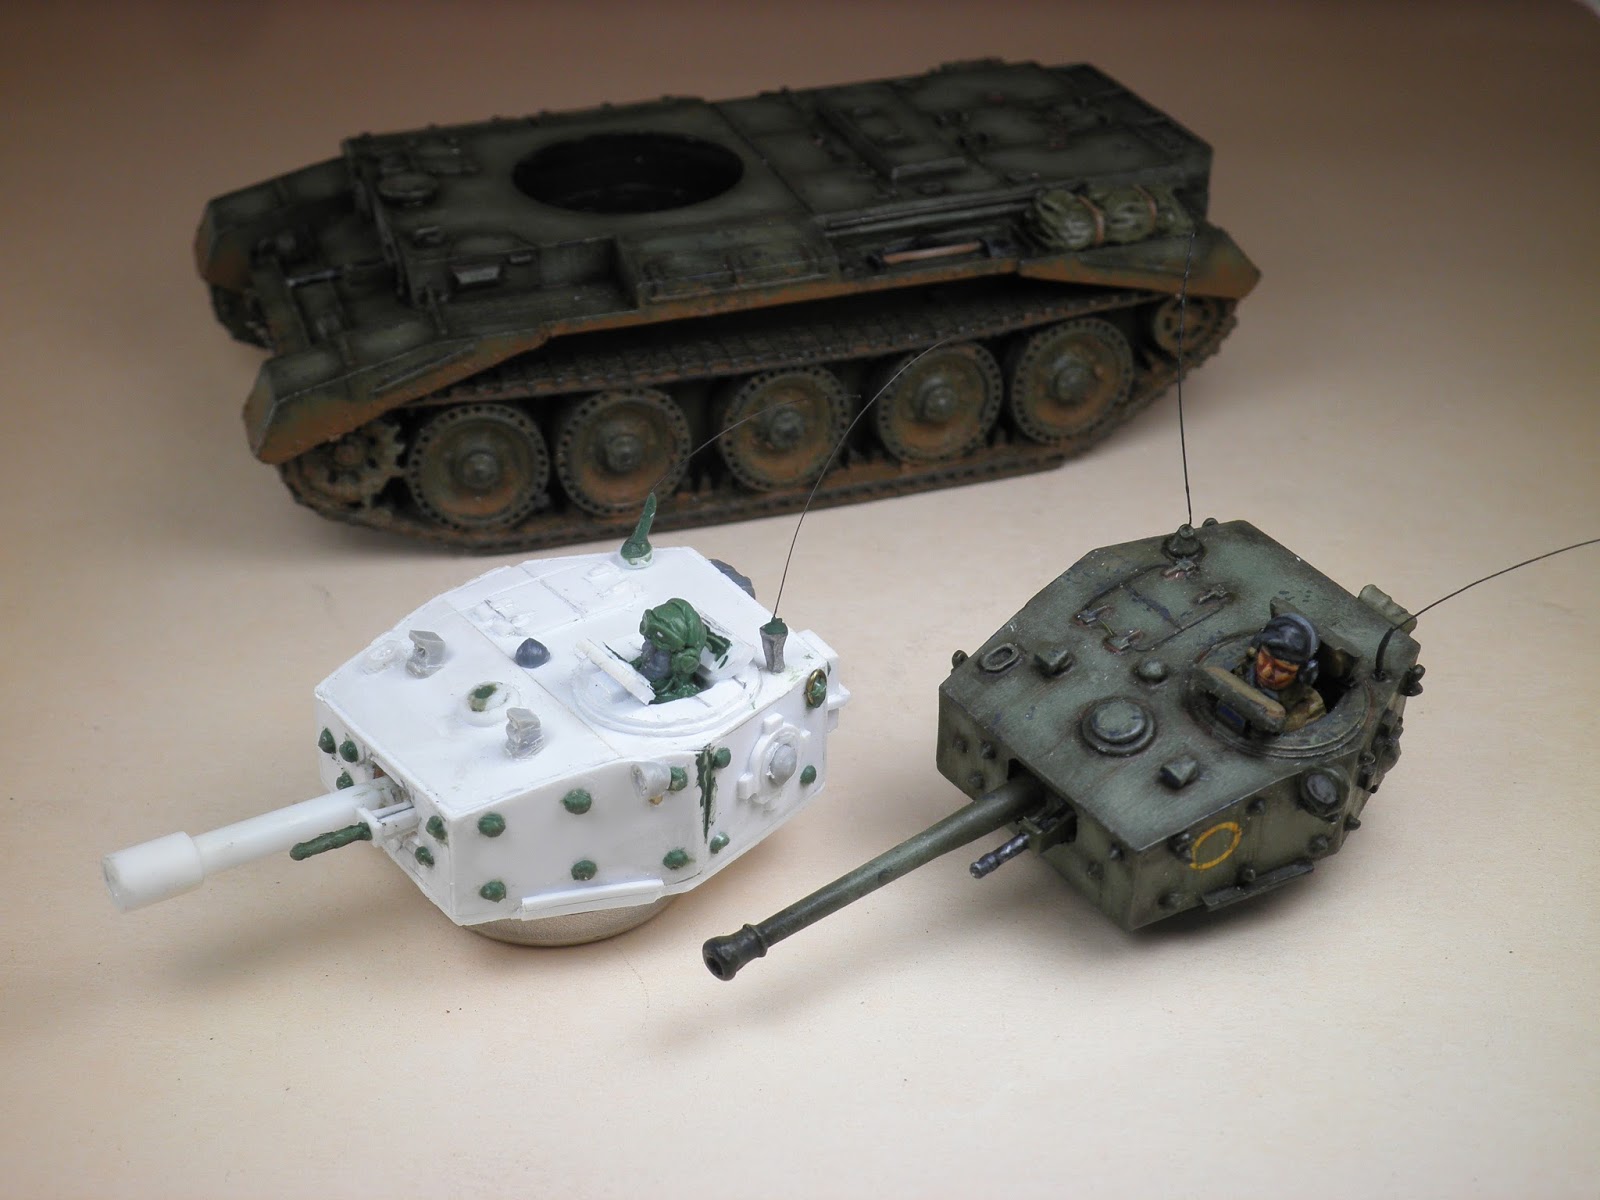
This vehicle is from Warlord games and is a resin model,I also decided to tconstruct a scratch built Centaur turret -for more info on scratch building see ARVE  Turret,Churchill Trailer and Flame Projector   - to be used interchangeably with the chassis allowing more choices from the Chain of Command Support List. 

The Centaur Turret is carved from a block of MDF and  encased with thin  sheets of plastic styrene found in hobby stores. I also used bits of plastic sprue from Infantry figures as well as brass rods and Green Stuff. The trooper in the turret is a Late war Brit,used Green stuff to sculpt a beret and head set.

So now I have both a basic Cromwell or Centaur turret ready to match up with the chassis.

.


CROMWELL TANK


CROMWELL CENTAUR TANK


Bottom view of the turret showing the MDF encased by the plastic stryene sheets.


The Centaur does not have a hull MG, I construct a pile of  gear and netting to cover the MG. It fits over the hull MG and is a snug fit,easily removed or added when required.


Saturday, 11 June 2016

LATE WAR BRITISH INFANTRY 28mm


Finally finished my British Platoon, all the figures are plastic from Warlord games.
These figures I describe as Good, Bad and Ugly.
Bad because of the time spent putting all the pieces together.
Ugly because of the amount of glue residue on my hands and the strong smell of glue in the air
Good  because of the numerous pieces, it gave me, a artistic license to be creative.
Having said that I am well pleased with the results.  
I have based the figures on Magnetic sheets. 
To improve the look of the figures: 
  • I added straps to the helmets and the rifles,SMG and Brens. 
  • with the meshed helmets supplied, I  added rags over the mesh with Green Stuff.
  • There was a limited number of poses available so I improvised by chopping and reattaching legs and arms to create more interesting poses.
  • I wanted the Bren team to be easily recognizable when mixed in with the Rifle team, so I converted the 2 crew members accompanying the Bren gunner. Both are carrying their rifles in addition one in holding a Bren Magazine while the other is holding the Bren spare barrel pack.  
  • The commander of the Platoon was equipped with a pistol attached to a lanyard around his neck. 
The Platoon includes:
2 x Senior Leaders
3 x Sections  each with 1 Junior Leader,3 man Bren team and 6 man Rifle team
As this Platoon is constructed for Chain of Command game a 2"mortar team and PIAT team.
accompany the Platoon as support elements.

Section made up of Junior Leader,3 man Bren team and 6 man rifle team.
The poses of the 2 crew members accompanying Bren are easily recognized when mixed in and in close proximity with the Rifle team. 

Bren Gunners with slightly different poses.
Image showing all the crews accompanying the Bren gunners.


They are based on square bases for easy recognized on the gaming table.

The Senior Leaders are bases on Hexagon bases to make them easier to recognize on the gaming table.
I wanted to give the Lieutenant a bit of character, so I made him  a"old school"  Vet from WW 1 still sporting a mustache and still hanging the pistol lanyard around his neck even though regulations state, it should be anchored on the waist belt.

Circled on the left is the figure used to construct the pose on the right. The red line indicated where to cut off the leg and reattach as shown in the imagines on the right. Some trimming maybe required to achieve the best fit, with the attachment completed use  Green stuff to fill in any gaps. 
As mentioned above follow the same steps to achieve the pose on the right. Note trimming the front underside of the boot with also alter the  posterior of the figure.
Container housing the Platoon.

The figures are all set on magnetic bases and the floor of the metal box acts as a good anchoring point for storing and transporting.
The Red Section has just been deployed.
Each Section has its own colour with the Senior Leaders and support elements in white. This was done for better organisation of the troops when deployment on the gaming table was called for. 

On completion of a game packing away the troops on the dots ensures that none have been left behind or dropped on the floor and forgotten...... as these troops ain't Rangers, troops will be left behind .
The container I used is one my favorite biscuits, "Wagon Wheels" these tin boxes are usually sold cheap just after Christmas or some major holiday in super markets.
I lightly sanded the tin, primed it and painted it black.