PART 1
I have been trying to get more gaming time in with Chain of Command lately while at the same time been busy working on 10 different half finished projects and not been able to finish any.
The last 3 weeks I have been consumed with creating buildings from MDF.
After gaming with pre made buildings on offer (both resin and MDF) in the gaming stores.
I noticed that I was not drawn to the resin buildings although they did have more texture on the face of the buildings creating depth which produced a more realistic look to the building.
The MDF lazer cut building were excellently made,were clean with perfectly cut sides that fitted together nicely. The downside was the exterior of the buildings had no depth looked a bit flat lacking in texture.
I also noticed that, gaining access to my troops within the buildings by removing and replacing a roof or floor was a bit fiddly.
When troops occupied all levels of a 3 story building it was hard to see which troops were on the other floors.
Constantly removing the roof was a hassle, if you left the roof off the building it did loss some of the realism and appeal of having buildings on the gaming table.
As always I saw it as a challenge to construct my own buildings from 3mm MDF sheets.
and finally my days spent in Wood working class in High school came in handy.
Making my own buildings would save me a great deal of money, although it would cost me in time spent constructing them but the personal satisfaction of creating,I think is priceless.
The areas I wanted to focus on improving were:
- be able to see troops on different floors without having to remove levels.
- If the roof was removed from the building I wanted to retain a portion of the roof on the building
- create a easier system for removing and replacing floors and roofs.
- produce depth and texture to the outer sides of the buildings.
The first part of the project was to raid the internet for images of French buildings, visiting French real estate sites proved to be productive.
Once I had the images I need to workout the dimensions and measurements, using heights and widths of doors provided me with a basic measurement for roughly working out the heights and widths of buildings and down scaling them into 28mm scale.
The next part was putting designs on paper with measurements,buying the MDF sheets, wood glue, and transferring the designs onto the MDF where a square ruler proved a valuable tool.
A hand wood saw was used to cut out the desired shapes, the doors and windows were cut out using a Dremel type hand motor and the perspex floors was cut using a metal cutting saw.
In PART 2 of this project I will add detail and texture to the buildings.
I managed to complete:
1 x Church
1 x Chateau
4 x WC
4 x Tool sheds
2 x Horse stables
3 x Barns
8 x Houses
1 x Cafe/restaurant
CHURCH
The Church I decided to initially model was the Sainte-Mere-Eglise which is famous for the American paratrooper John Steele who caught his parachute on the church building during D day, the story portrayed in the movie the longest day, present day, a manican of a paratrooper can be seen hanging off the building.
Half way thru the project I realized that the church was going to be too big for the gaming table and had to reduce the width and length of the building dramatically.
This meant that the church was no longer the Sainte-Mere-Eglise but a "mimi me" imitation. "O well you can't have everything"
 |
| Floor plan transferred onto MDF |
 |
| cut out with wood saw |
 |
| Entrance of church |
 |
| side wall facings of church |
 |
| Placing the walls of the church together to check fit. at this stage I noticed that the church looked huge. |
 |
| Trying out a technique to create texture on the building using a saw. |
 |
| trying out mimicking individual stones on the building using a Demel type hand motor and a round bur. |
 |
| Happy with the results |
 |
| Door frame added and detail cut into the MDF around the window. |
 |
| Starting the assembling and gluing stage,square rule used to make sure the walls are vertical. |
 |
| A bit of hardware used to apply pressure while the wood glue cures. |
 |
| I decided that the church was going to be huge and unsuitable for a gaming table.Time to put plan B into action I decided to reduce the width, and length of the church by well over half. |
 |
| Church cut down in size. |
 |
| Cutting down the width and length meant I had to resize the over components of the church I had already prepared. |
 |
| After resizing I assembled and glued in place. |
 |
| Roof sections were all resized |
 |
| stage finished roofs are removal if you notice the lower portion of the roof is glued onto the building this was done so that when a portion of the roof is removed that portion of the roof remains. |
 |
Its no longer the church that I wanted to build but I am happy with the modified results.
Next stage to complete, the details.
|
HOUSE WITH BARN AND SHED ATTACHED
 |
| Floor plan |
 |
| All the walls cut out. |
 |
| Assembled and glued together |
 |
| Tool shed pieces cut out |
 |
| Barn pieces cut out |
 |
| Barn and Tool shed glued into position |
 |
| cutting perspex with a metal saw |
 |
| Perspex floor in place and upper floor walls glued in place. |
 |
| Roof added to both Tool shed and Barn pictured below |
 |
| completed with figure for scale |
 |
| Notice the partial roof remaining on the building when the roof is removed. |
THE CHATEAU
I decided to loosely model this Chateau I found on a French real estate site.
I did not want to repeat the mistake I made with the church and decided to down size the chateau by not replicating the windows either side of the door.
 |
| Complete model |
 |
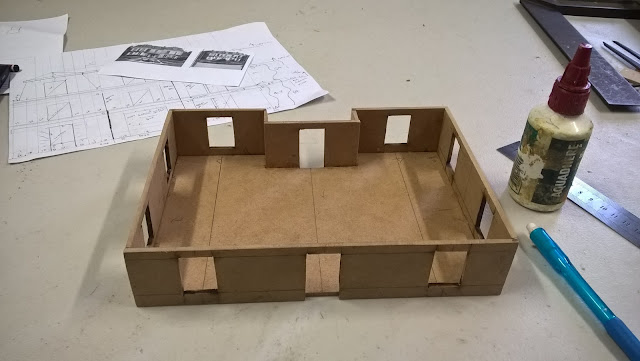
| Plans drawn up and ready to transfer onto the MDF |
 |
| floor plan cut out. |
 |
| Ground floor walls ready |
 |
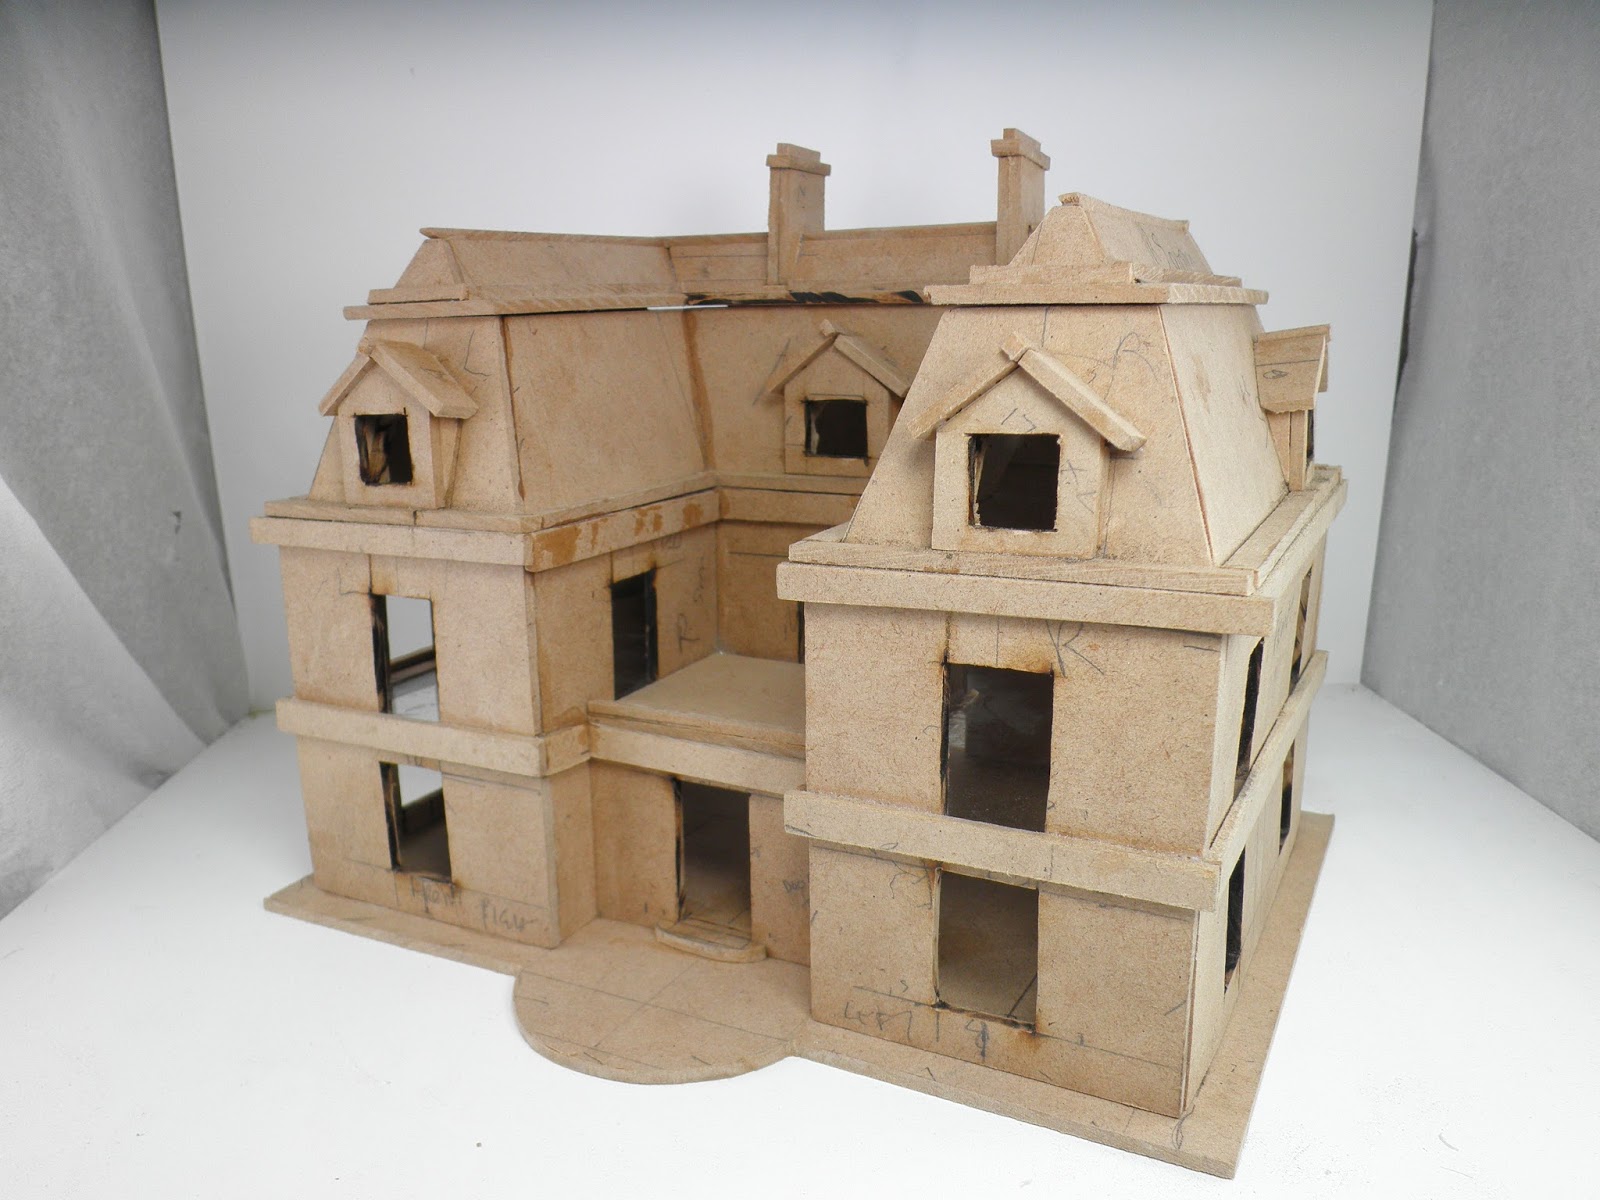
| Back view assembled and glued together |
 |
| Front view |
 |
| Perspex floor and 1st floor walls cut out and glued in place. |
 |
| Perspex floor cut out and ready for the addition of Attic |
 |
| Roof section cut out ready for assembling |
 |
| Glued in postion. |
 |
| window installed in Attic |
 |
| Roof and chimney added |
 |
| rear view. |
 |
| next step to add detail and texture. |
I built 2 small farm houses loosely based on these imagines
 |
| House with one Attic window |
 |
| House with one Attic window |
 |
| House with 2 attic windows |
 |
| side and rear view |
 |
| Roof removed to reveal the attic. |
 |
| Showing how the attic floor can be removed to attend to troops on ground level. |
DOUBLE STORY BUILDINGS
The following 2 buildings were based on the following images
 |
| building with attic window. |
 |
| building without attic window. |
CAFE/ RESTAURANT
This building is based on a image I found on Pinterest.
 |
| side view |
DAMAGED BUILDINGS
HORSE STABLES
BARNS
TOOL SHEDS
WC
STAY TUNED FOR PART 2 AS I ADD TEXTURE AND DETAILS TO ALL THE BUILDINGS


Very impressive work. I wish I had the skill and the time to make my own buildings.
ReplyDeleteI'm looking forward to the next update to your blog.
Thanks Raplh, hopefully I can finish the next stage very soon
Deletecheers John
I hope you wore a mask while cutting all that MDF.
ReplyDeleteThanks Jim for your concern, yes MDF creates very fine dust and is dangerous to your health, I was wearing a mask with a value in the front,its actually in the background of some of the imagines posted.
Deletecheers John
Wow that is amazing, I am really impressed especially with the etched brickwork on the church.
ReplyDeleteJohn
Thanks John for your comments, yes I too liked that finish.
Deletecheers John
You are my hero! :)
ReplyDeleteThe Perspex is a brilliant idea. I agree that having to do all of that level removing is a hassle.
It will also help with game cleanup and you shouldn't be forgetting guys in buildings... :)
Thanks Neal for your comments, yes its very easy to forget troops in the ground floor of a building.
Deletecheers John
Great to see such dedication, well done the results look great
ReplyDeleteThank you Dave for your comments
Deletecheers John
Very nice work. Any plans on making them available for purchase?
ReplyDeleteThanks John for your comments, If I was retired from full time work I would consider it but I can't see that happening in the near future.
DeleteYou could try making some up yourself.
cheers JOhn
Ah, I see now. The buildings are of such good quality I thought they were cutout using a laser cutter. On closer inspection I see that they aren't which mean that I am very much more impressed.
DeleteOnce again thanks John,Yes I did the majority of the cutting and filing the old fashion way with a hand saw and a metal file.The doors and windows cut out with the help of a Dremel type hand motor.
Deletecheers John
I know this was an old article but I only heard about your site a couple of months ago. I was wondering how you cut out the openings? Drill the corners and then pass a coping saw blade through? Sorry I'm not very handy was I was thinking foamcore might work the same? Really like your stuff and it has inspired me to try and do better at my "tarting up my buildings" as TFL say *-)) cheers from across the really wide pond.
DeleteThese are great looking buildings very well done!
ReplyDeleteI have gone with Sarissa laser cut ones myself as my time is more valuable than the dollars they cost...when I'm retired and time rich and money poor I'll probably change my view :-) !
Thanks Captain Darling for you comments, Sarissa as well as Charlie Foxtrot make some really nice model buildings, and yes you can't have it both ways time and money.
Deletecheers John
These look fantastic...love the church
ReplyDeletereference the wall finish consider plastering the walls in pva and sand for a rendered finish
PS hope you are wearing a mask with all that mdf dust
Thanks Eric for you comments and concern for my safety.
DeleteI was considering using that technique on the surfaces of the walls but I decided I would etch in the detail using a Dremel type hand motor. Its a messy process but I like the results I am getting.
Yes I was wearing a mask, and have switched to a more heavy duty mask for doing the etching.
cheers Johm
Your terrain making skills John are right up there with your model conversion and figure painting skills. Look forward to part 2.
ReplyDeleteThanks Pat,I currently making lots of terrain pieces and using your blog as a great reference.
Deletecheers John
Just discovered this. Very impressive work. I did something similar last year and bookmarked this for my own future buildings as well
ReplyDeleteThanks Ancientcociety for your comments, good to know it is useful for you, cheers John
DeleteAmazing work. I'm left speechless!!
ReplyDeleteThanks Raplh for your comments, cheers John
DeleteJohn, I'd really like to build Sante-Mare-Eglis in 1/28th scale but am having trouble finding a floor plan or any dimensions for that matter.
ReplyDeleteDid you just extrapolate from pictures or did you find that info online somewhere
Merl, Do you mean 28mm or 1/28 scale, building Sante Mare Eglis in 1/28 scale is going to a very large buildings. I started to build that particular church but as I was building it I realized it was going to take up most of the gaming table, so I reduced by more than half.
DeleteI have had a look for the floor plans I drew up but I must have thrown them out but I can measure the current church building I constructed and send you the measurements.
I worked off images, a helpful item is to look on the back of Ewar Plastcraft make the church in 1/72 1/56 scale follow the link: http://plastcraftgames.com/en/ewar-15/104-sainte-mere-eglise.html
I know if you look at the back of the pack of the 1/72 scale church it gives you the overall measurements of the church. you could then use a scale calculator (found on the web) to upscale to 1/28. hope this help cheers John
Cracking work John, if you need some photos from Normandy let me know.
ReplyDeleteCheers
Matt
Thank Matt
Deletecheers John
Superb work - the detailing on the church is particularly impressive.
ReplyDeleteThanks Pat G for your comments
Deletecheers John
Hi
ReplyDeleteI am new to wargamming and cannot afford to buy MDF buildings for my early figures (1939-1940).
I am inspired to make my own from your examples. My question is do you have copy's of your plans? You don't put any measurements down and I am struggling decided on the size of the buildings. I am happy to pay or donate some money to a charity of your choosing if you can supply a PDF of them!
Regards
Stuart.
Hi Stuart, No I don't have copy of the plans but I can give you some basic measurements if you are on facebook send me a message to John Pilatos
Deletecheers John
wow
ReplyDeleteThanks Abdul
Delete