CLINK HERE FOR A COMPLETE INDEX TO ITEMS ON THIS BLOG

Showing posts with label CHAIN OF COMMAND GAME MARKERS & AIDS. Show all posts

Thursday, 14 November 2024

LINE OF COMMUNICATION MARKER

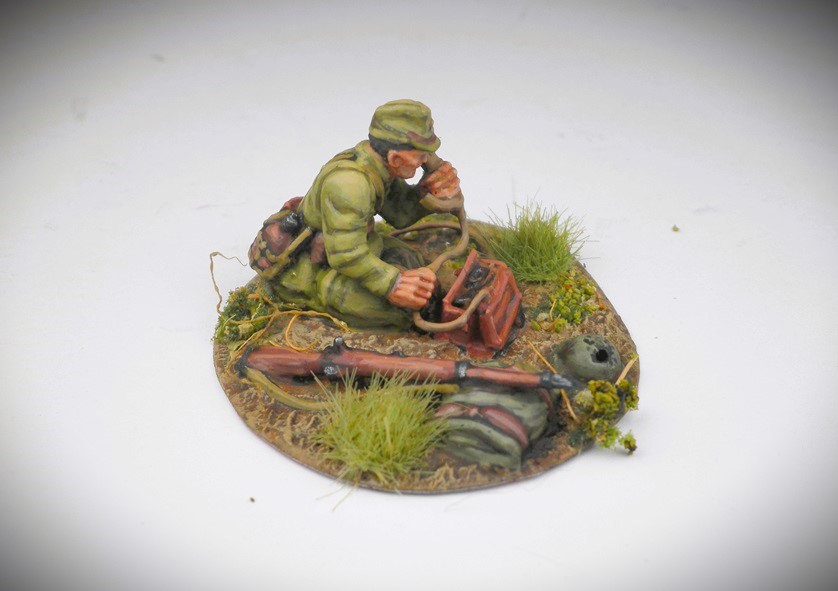
Scratch built two Line of Communication Markers for the FAR EAST, one Australian/British and a Japanese one.

The Australian/British one is constructed with a Perry plastic 28mm 8th army figure while the Japanese one is also plastic but from the Warlord games Japanese Infantry figure.

With the use of some plastic surgery on the figures and Green stuff putty together with some scrap plastic bits I made the communication equipment.  


AUSTRALIAN/BRITISH COMMUNICATION MARKER

JAPANESE COMMUNICATION MARKER 


Cheers John

Thursday, 4 January 2024

DICE TOWER with built in silencer

I made a portable dice tower, with 5mm MDF equipped with a Perspex window to view the dice tumbling down the tower, unfortunately the lack of thickness of the wood resulted in  one very noisy dice tower. 

To combat this I made another dice tower but this time I purchased a thin rubber sheet from the 2 dollar store. Once more, I used 5mm MDF and cut out all the parts of the tower, then applied Gorilla glue onto all the inner surfaces of the dice tower that would be in contact with the dice and placed them on the rubber sheeting. 

Once the glue dried, I carefully cut out each piece of  the tower from the rubber material. I sprayed all  parts of the tower  black that were not lined with the rubber material with black spray can. 

Allowed a couple of days for the paint to dry, then carefully drilled pilot holes for the tiny screws, secured all the parts together first with glue and then added the screws. I drilled suitable holes on the underside of the tower to accommodate some small earth magnets and glued them in place, then aligned thin metal strips on the bottom plate of the tower to enable the tower to be used with or without the base.

Happy with the results of  the silenced tower.  

My completed new Dice tower with the internal rubber sheeting and removable base.

My first Dice tower without the internal rubber sheeting.

The new silenced Dice Tower with the internal rubber sheeting.

The benefit of the removal base is that once the dice are rolled the tower can be removed to reveal the results of the dice throw. 

The thin black rubber sheet I used for the tower.
The new portable tower next to the fixed tower (I built a long time ago) we used in my gaming room.
Cheers John

Thursday, 25 February 2021

SHOCK, PINNED AND BROKEN MARKERS for CHAIN OF COMMAND

While waiting for the flock to dry on my French Marines for FIW, I thought I would share a brief rundown of my Shock, Pinned and Broken  markers I have used and currently use.


1st Attempt: 
The first Shock markers I used were these Wooden ones I purchase during a break in gaming while attending my first Chain of Command event at MOAB many years ago (available from Olympian games). 

After the event at MOAB I  painted the Markers Red for Shock, Yellow for Pinned and Black for Broken units and continued using these as my markers for a while.


2nd  Attempt:
After a couple of games of CoC I decided to make my own Shock, Pinned and Broken markers and used Beads painted red that would stick onto a circular base that was magnetized for my Shock  markers.

I made my Pinned and Shock markers out of 2 pieces of Perspex, one piece was colour yellow the other black and glue together.

One side was Broken, the flip side was Pinned. I have previously posted the details for these markers here.


3rd  Attempt:
Some time later after much gaming, I found it a bit too cumbersome removing and adding shock beans to my counter and noticed a lot of gamers where using dial counters. 

 I decide to go back to my old wooded Shock markers by incorporating them on top of my scratched built dial counters made from Warlord games plastic bases. As I have  abundant supply of plastic bases due to the fact I make my own bases for my miniatures.


I also decided to revamped my old wooden Pinned and Broken markers by repainting them and adding the wording, as I found the Perspex ones where a bit too bulky.
Team Pinned.
Team Broken


 4th   Attempt:

Sometime later I noted the simple Shock markers Jason Sendjirdjian was using with his Vietnam battles and decided to make my own. Using red Perspex I cut the Perspex into a  Hexagon shape and used my hand motor to inscribe numbers and coated them with  Metallic paint to highlight the numbers.
One side of the Hex is numbered from 1- 6 while the other side is numbered from 7- 12.
The way these counters work is that you place the maker corresponding to the number of Shock the team has accumulated hard up against the figures base. In the image above this team has accumulated 1 shock.
I love using these Shock markers as they have a low profile and simple to use, you don't need to pick up the counter to change the number, you simply turn it according to the loss or gain of Shock, of course if the Shock is over 6 you flip it over.  A couple of my regular opponents don't like them and are constantly asking what shock value a team has accumulated which lead me to develop the next set of Shock markers to use whenever I game with them. 
(I am tempted to make another set of these using  opaque green perspex to blend into the gaming table better)


5th   Attempt:

These are my 5th and final shock markers I have constructed, these are made from Perry miniatures plastic bases and are numbered from 1- 8.

The upside of these markers are they are smaller with a lower profile than the first set of dial markers I previously made and stick out less due to flocking the base and using a small circular red dot to indicate it is a Shock marker.
I also made new Pinned/Broken markers on a Perry plastic base.
One side has a yellow dot to indicate Pinned status.
These make for low profile markers.
When flipped over a black dot indicates the Broken status.
Team with Pinned marker
Team with Broken marker

As a side note I originally created a tiny Shock marker similar to the Shock markers supplied by TFL but later cut them all down into circles.
If you are wondering where I got my supply of coloured plastics for the markers, Iook no further than the kitchen pantry but make sure the missis in not around. 

Here is how I made the dials, I have since simplified how I make dials as can be seen in my recent What a Tanker Dashboard where I use 2 bases and a nail .

Perry miniatures plastic bases. 
Each dial is made up of 3 plastic bases and spare plastic sprues from left over kit models

First step is to find the center of the plastic base and clamp all 3 of the bases together.

Select a suitable drill bit which matches the diameter of the plastic sprue that will be used.

Drill the hole.

As you drill each set keep them together.

Select one of the bases and mark a small circle around the hole with a pencil. 

Use a handpiece to cut along the marked line. 
Trim off the excess from the smaller piece 
Next step is to place some super glue on the rim  of the larger base and secure one of the bases over it.


Use a pencil to  divide the base and mark out the numerals 

Use a hand motor to inscribe the numbers

Apply paint over the numbers.
As soon as you finish applying the paint place you finger over the painted number and move it over it.

This will remove the paint on the flat surface of the base leaving the paint intact over the number.
Completed painted numbers.
Secure the single base with super glue onto the sprue 
Allow the super glue to dry, next step is to slide the base with the 2 bases glued together onto the sprue.
Slide the bases together but do not glue them the double base.
Next, use coarse sandpaper  to thin down the smaller piece a little bit. 

Slide the smaller piece onto the sprue and mark with a pencil ( I think I over sanded this small piece of base.)
Remove the pieces and cut off the sprue which was previously mark with the pencil.

Mark out the boundaries corresponding with the  number with a pencil and transfer that onto the top base.
Use a hobby knife to cut out that piece from the base.
Place all the pieces together and carefully place super glue on top  of the sprue and the smaller base only.
To make the Shock marker similar to the TFL ones, Use discarded lids such from peanut butter or similar products and use a hobby knife to cut out shape needed.
Completed dial Shock marker
(as mentioned before I later modified the star shaped marker into a small circle)

CHEERS JOHN