These are my smoke markers I will be using for Chain of Command game, they include markers for smoke grenades, mortars and Barrages.
There was a need to be able to differentiate between smoke from a smoke grenade and smoke from a 2" mortar or off-table mortars.
As smoke grenades do not block LOS but add a -1 to the die roll To-HIT a target behind the smoke while smoke from a 2" mortar or off-board mortars does block LOS
There was a need to be able to differentiate between smoke from a smoke grenade and smoke from a 2" mortar or off-table mortars.
As smoke grenades do not block LOS but add a -1 to the die roll To-HIT a target behind the smoke while smoke from a 2" mortar or off-board mortars does block LOS

SMOKE GRENADE
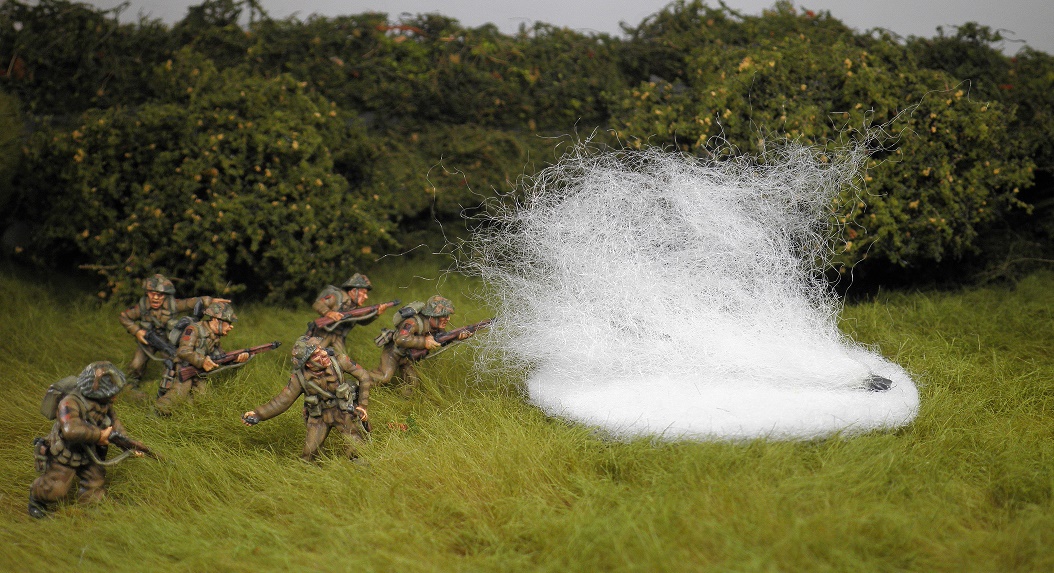
British Infantry throwing another smoke grenade to cover their advance.


Filter made from Polyester sheet cut into circles 3 inch diameters.
(Stryene material can be used for the base instead of the sheet filter material see Smoke markers for Mortars below)

(Stryene material can be used for the base instead of the sheet filter material see Smoke markers for Mortars below)

Plastic tubing or model plastic sprues can be used to represent the smoke grenade.
here I have used Evergreen plastic tubing painted black and cut in small segments.
Polyester pillow filler is used to represent the smoke.
here I have used Evergreen plastic tubing painted black and cut in small segments.
Polyester pillow filler is used to represent the smoke.

A small portion of the Polyester pillow filler is glued onto the tube and onto the fiber base using super glue.
 Set aside and allow the glue to set
Having a base that is the right measurement is a good gaming aid that helps with clearly, marking out the area that is covered by smoke and avoiding any disputes.


Having a base that is the right measurement is a good gaming aid that helps with clearly, marking out the area that is covered by smoke and avoiding any disputes.

I was inspired by Ste Sheeran who made these great smoke markers unfortunately I can't find a link to where I saw his markers.
MORTAR SMOKE

Smoke from a 2 inch mortar covering the advance of the same British Infantry.


I used thin dense styrene for the base.
Sheets were cut into circles 3 inch diameter with a hobby knife.
 The edges where tapered using the hobby knife and then smoothed with fine sandpaper.

PVA glue was placed on top of the base and the Polyester pillow filler was placed on the glue and set aside to set.
I turned the marker over so that the Polyester filler was on the bench and the base was on top ,
I then placed a light weight over the stryene base to increase the contact between the PVA and the Polyester filler and set aside for the glue to set.
Sheets were cut into circles 3 inch diameter with a hobby knife.


PVA glue was placed on top of the base and the Polyester pillow filler was placed on the glue and set aside to set.
I turned the marker over so that the Polyester filler was on the bench and the base was on top ,
I then placed a light weight over the stryene base to increase the contact between the PVA and the Polyester filler and set aside for the glue to set.

Completed smoke marker.
BARRAGE MARKERS

Unlucky British section caught in a Mortar Barrage.
 The Mortar Barrage in all its devastating glory.
The dreaded weapon of CoC.

The dreaded weapon of CoC.

Items needed: 0.90 mm metal wire and large mud guard washers.

Cut 3 wires of different lengths with the longest being 18 cm .


Bend the wire at the base 90 degrees and glue in place with a hot glue gun.

Coarse turf ,clump flock and a mix pipe cleaners to construct the smoke..

Cut the pipe cleaners in a variety of lengths and start gluing them onto the base.

First stage finished.


Top view on stage 1.
 Position some of the clump foliage in the middle of the pipe cleaners using the hot glue gun.
An alternative to using clump foliage is to use the larger shaped bits of pipe cleaners spray them with adhesive and roll them in coarse turf.

Secure the thick pieces of pipe cleaners onto the metal wire length ways using the hot glue gun.
Ensure that the metal wire is covered with these pipe cleaners on both sides.
 Next step is to use the thin pipe cleaners around the recently covered wire and secure with the glue gun.
 The red line show how the thin pipe cleaners are wrapped.

To taper the thinner individual pipe cleaners projecting out of the clouds of smoke.
Use a match and run it underneath the pipe cleaner starting from the tip to the base.
 Carefully spray the 3 long areas with spray adhesive and flock with coarse turf.
 Next step bind the surface of the Barrage Marker with either Spray with watered down PVA or a spray can binder such as Fixative ..
 You can use a cheap black spray can to coat the marker
and fill in any missed spots with cheap student acrylic black paint.

Using Student white acrylic paints dry brush the black areas to create a bit of depth and finally paint the base a Earth colour.
Once dry I give it a coat of Spray Dull coat to matt up the surface.
I have to thank Mark "The Tactical Painter" for Inspiring with his Barrage Markers.
Cheers John.

An alternative to using clump foliage is to use the larger shaped bits of pipe cleaners spray them with adhesive and roll them in coarse turf.

Secure the thick pieces of pipe cleaners onto the metal wire length ways using the hot glue gun.
Ensure that the metal wire is covered with these pipe cleaners on both sides.


To taper the thinner individual pipe cleaners projecting out of the clouds of smoke.
Use a match and run it underneath the pipe cleaner starting from the tip to the base.


and fill in any missed spots with cheap student acrylic black paint.

Using Student white acrylic paints dry brush the black areas to create a bit of depth and finally paint the base a Earth colour.
Once dry I give it a coat of Spray Dull coat to matt up the surface.
I have to thank Mark "The Tactical Painter" for Inspiring with his Barrage Markers.
Cheers John.
Thanks for a tutorial. looking awesome!
ReplyDeleteThanks Michat for your comment
Deletecheers John
Excellent!! thanks for sharing John
ReplyDeleteNo worries GReg and thanks for your comment.
Deletecheers John
Bravo!Bravo!
ReplyDeleteThank you for your comments
Deletecheers John
Great tutorial as always - you make it look so easy (except for the cobble stone roads - I would never have the patience!) BUT where is the rule that smoke grenades only cause a -1 on the To Hit die? I can't find it - is it a house rule? Dick Bryant
ReplyDeleteDick, it's in the most recent FAQ on the third page: 'Smoke grenades do not completely block line of sight, but any Team which has men firing through smoke will apply a -1 to any roll to hit their target for the whole Team.'
DeleteThanks Dick for you comments and thanks Mark for replying to Dick.
DeleteGrenades are also limited now equal to the Command Initiatives of the Leaders.
follow the link:
http://toofatlardies.co.uk/blog/wp-content/uploads/2017/11/CoC-Errata-FAQ-1.pdf
cheers John
Those look great
ReplyDeleteThanks Pat for your comments
Deletecheers John
Fantastic stuff John. I may well be stealing these ideas for my own games! Thanks so much for sharing!
ReplyDeleteGlad to be of help, thanks Stiubhart
Deletecheers John
Fantastic stuff as always. The trees in the background look amazing! Would you mind sharing your method?
ReplyDeleteThanks Zache, yes I am working on a how to for trees.
Deletecheers John
Goodness me John. You are a modelling maestro! These are superb.
ReplyDeleteCheerio
Matt
Thanks you Matt,
Deletecheers John
Great stuff John, love the extra bits of detail in the barrage markers, makes me jealous!
ReplyDeleteThank you Mark for your work on your Barrages which inspired me.
Deletecheers JOhn
As always inspirational and instructive John. You do make it seem doable even by "passion fingered" individuals such as myself!
ReplyDeleteThanks you Carlo, for your comments
Deletecheers John
great tutorial John,
ReplyDeletereminds me of Stan Catchpols article in the eighties
cheers
Matt
Thank you Bluewillow
Deletecheers John
I am just making some smoke markers for 2" mortars using the pillow stuffing. How do you keep the pillow stuffing from pulling apart?
ReplyDeleteJohn
John try a pull apart a piece that is the size you want to represent the smoke , don't try and bind pieces together as they are more difficult to bind together on the base.
Delete