CLINK HERE FOR A COMPLETE INDEX TO ITEMS ON THIS BLOG

Monday, 25 February 2019

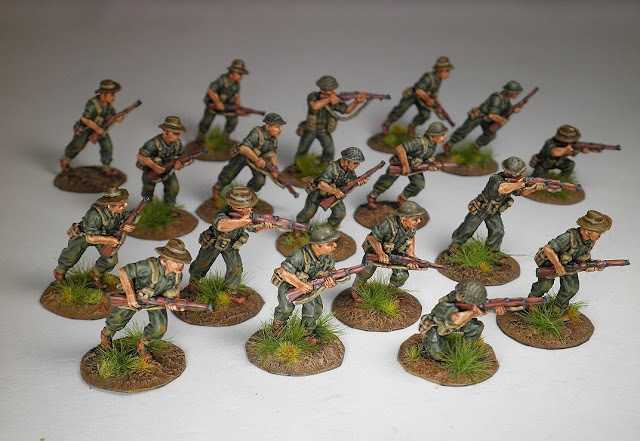
LATE WAR AUSTRALIAN INFANTRY IN THE PACIFIC 28mm

I was torn between portraying early war or late war Australian platoon. 
I finally decided to go with  Late war Australians sporting the greener uniform as opposed to the Khaki uniform of the early war Aussies. 
I purchased the 28mm Perry metal range to portray them,
together with a box of Perry plastic 8th army, which I purchased a while back during a bargain sale for less than half price. 
The plastic Perry figures would make up the numbers. 
What appealed to me about the Perry figures is there realistic poses and they look normal as opposed to the Heroic look.


Metal figures just out of the box ready to commence trimming the metal flash, I must admit there was quite a bit of flash to trim off.

Perry plastic 8th army figures converted into late war Australians using Green stuff putty, converting the shorts into long trousers. 

Perry metal slouch hats where also used to replaced about half the Platoons hard helmets.

I decided to scratch build some Owen sub-machine gun. 

I used metal wire, soldered together and trimmed to shape to form the Owen gun.

Figures undercoat with a black primer.

Figures completed.

All the riflemen.

All these figures are metal, the slouch hats were added by trimming off the metal helmets and gluing the slouch hats in position.


Added tuffs, I make my own tuffs using DIY static grass applicator

I decide to allow a bit more of the  brown to show on the base of the figure, so that they would be easier to spot in the jungle terrain. 

Four Bren teams, a mix of metal and plastic figure.

Bren team, first figure is a plastic the others are metal figures.


Junior Leaders with square bases, some with sub-machine guns others with rifles.

Senior Leaders with pistols, I could not make up my mind which one to keep as a SL, so I painted them both.

Metal figure on the left, plastic on the right.
Hexagon base was used to distinguish them from the rest of the troops.

Senior Leaders, one with Owen smg the other with a rifle.

Both are plastic figures.

Plenty of sub-machine guns for the Aussies troopers.


2"(metal) mortar team.
 

This plastic figure is matched up with a metal slouch hat. The PIAT is a spare part from the Warlord games late war British infantry set, I had to modify it to match the figure.

ATR team.metal figures.


This figure is from Eureka range of late war Australians, it was a pleasure to paint as is was sculptured with well defined lines and hardly any flash to trim off. 

I also added a rifle strap with Milliput.
It fits in nicely with the rest of the Perry figures.

Painting guide:
Metal Helmet:
1.Base coat: Vallejo Model colour Russian uniform.
2.Washed : Agrax Earthshade, once dry place a thin layer of Nulin oil wash around the rim base of the helmet. 
3.Dry brush with VMC Russian uniform with a touch of VMC Iqaui sand.
4. Add more VMC Iquai sand to the Russian uniform and drybrush the top of the helmet and some of the edges.
5. VMC Black Grey spots to add some wear on the helmet.

Slouch hat:
1. Base coat with Vallejo Model colour English uniform.
2. wash with Agrax Earthshade 
3. Highlight with VMC English uniform 
4. further highlight by progressively adding VMC Iquai sand to the base coat.

Uniform:
1. Base coat with VMC Olive grey
2. wash with Agrax Earthshade 
3. Highlight with VMC Olive grey
4. further highlight by progressively adding VMC Iquai sand.

Webbing,Gaiters and rifle strap :
1. Base coat with VMC Khaki
2, wash with Agrax Earthshade
3. Highlight with VMC Khaki
4. Further highlight by progressively adding VMC Iquai sand.

I just managed to complete my Australian platoon a day before  they were due to be shipped out to the Chain of Command event at CANCON 2019

Only posting a  couple images from CANCON,( as a lot were posted by different people on Facebook) 


I recommend visiting Mark's blog: Tactical Painter if you are interest in viewing some great images of the gaming tables taken by Mark. 

Anyway the Australians are  making their way across the paddy fields toward the Japanese JOP. 

Aussie section watching a Mortar Barrage blasting the Japanese.


Hard going thru Kunai grass. 

cheers John 


Tuesday, 19 February 2019

PAPUAN INFANTRY 28mm

These Papuan Infantry figures where beautifully sculptured by  Kostas Herko ,the detail is clearly defined and a pleasure to paint. They are available from Eureka miniatures

After participation at the CANCON event, followed by  a couple of weeks holidaying up the coast here in Australia, I decided to paint up these figures to get back into the swing of painting again, 
I hope to do a bit more figure painting this year as opposed to building Terrain, in order to reduce my lead mountain, "anyway that is the plan".


For a bit of added detail, I modeled gun straps from Milliput for each of the 8 riflemen I purchased.

Papuan Infantry moving cautiously thru the jungle.

The colour scheme:
Skin: 

Vallejo model colour Burnt Umber.

A wash of Nulin oil was added.

I highlighted by progressively adding VMC Iquari sand to Burnt Umber.

Webbing:
Base coat is Vallejo Model colour Khaki.
washed with Agrax Earthshade.
Highlighted by progressively adding VMC Iquai sand to the Khaki.

The tunic is VMC White grey with a thin wash of Nulin oil and a bit of highlight added with VMC Middlestone and Flat earth.

The rifles was painted using VMC Maghogany and highlighted by progressively adding VMC Iquai sand.

Here the Metal figures,mounted on magnetic bases.

The Aussie, Junior Leader is advancing with his section of Papuan infantry  thru the jungle on the prowl for Japanese. 


Cheers John


Monday, 18 February 2019

MODELLING HEDGES AND GATES

This is tutorial for making hedges and gates.
I have constructed 3 different hedges one classed as a Medium Obstacle the other 2 low Obstacles.


HIGH HEDGES
Rural Hedges, these are hedges that are not maintain and are a bit wild and messy .
Cut a number of 3 mm MDF into lengths of 15.5 cm x 3.5 cm and 7.5 cm x 3.5 cm.

Bevel the edges using box cutters.

Image showing the edges trimmed.

Using PVA glue add some gravel and odd rocks.

Undercoated.

Dry brush the gravel and rocks with Vallejo Model colour Desert Yellow and highlight by adding Iraqui sand to the Desert Yellow.

Apply some green paint on the base.

I used Rubberized Horsehair for the hedges. 
Images shows how I cut a piece of horsehair to match the length of MDF.

Images shows all the Rubberized horsehair trimmed to size and ready to be fixed onto the MDF bases.

Using a hot glue gun apply glue to one side of the Rubberized horsehair. 

Note where I am applying the glue, it should be the side which exposes all the layers of Horsehair.

Once you place the hedge material on the MDF base, hold it down firm for a minute till the glue sets.

Horsehair fixed in place.

At this stage to can spread out the horsehair by using a pointed instrument and add some randomness to the top of the hedge  using the scissors.

I prefer to add PVA with a brush then add the flock onto the fiber.
You can also use canned Spray Adhesive instead if you prefer.
I used Gale force 9 Meadow blend for most of my hedges but you can use any flock you wish.


Finished hedges

The hedge is higher than a 28mm figure and are classed as a Medium Obstacle.

In Chain of Command:

They block LOS unless a figure is "usually" within 2" to  be seen and see thru the hedge.

A figure needs to discard its higher dice rolled to cross over the hedge.
Tracked vehicles only can cross with 2D6 with the chance of getting stuck , if doubles are rolled. 


LOW  HEDGES

These hedges are lower in height, up to waist height and do not block LOS, its classed as a low Obstacle and to cross this hedge you roll 2 D6 and discard the lower dice.

The MDF base is the same length and width as the Rural hedges but the Fibers are lower as seen in the image above ( up to waist height).

I like to apply the PVA glue directly onto the hedge using a old brush.

For these hedges, I used Woodlands Scenic fine earth-blend to apply on the area that the hedge meets the MDF to simulate soil.

I covered the hedge with Woodland Scenic fine turf.

Once dry I applied PVA  glue to the MDF base and applied flock that matched my gaming mat.

The final step was to highlight the hedge by dry brushing the hedge only ,with Vallejo Model Colour Middlestone .
The final product with 3 distinct layers, the hedge,soil and grass.


QUICK LOW  HEDGE 

This hedge is also a low maintained hedge it has the same characteristics as the last hedge.
I call this hedge, the "quick low maintained hedge" because its quick and easy to make.

I thought I had discovered a new way of making hedges as I had not seen anyone on the web making hedges from a Coir door mat but after completing the hedges, I stumbling onto the "Terrain Tutor " take on hedges where he had a guide on how to make this type of hedge. ..."so there is nothing new under the sun".

Flip the Coir mat over and cut strips with box cutters.

Strips ready for next stage.

Using a can of  adhesive spray, cover the whole coir surface and  apply fine flock.
I recommend  wearing gloves.
I used Woodland Scenic green fine turf ,adding a highlight of some lighter colour fine turf.


GATES

The gates are constructed with large matches and bamboo sticks glued together and based on a 3 mm MDF base. 

Once glue is dry, undercoat.

Dry brush with Vallejo model colour Beige. 

 Highlight with VMC Biege mixed in with some VMC Iraqui sand.

Further highlight the fence with Vallejo model colour Middlestone with a touch of Iquai sand.

MDF base painted.

Add Rubberized horse hair on the either side of the gate and secure with PVA glue.

Once dry paint PVA glue on the MDF and rubberized horse hair and apply fine flock.

Completed gate.

The reason I have  placed  rubberised horsehair on either side of the gate is to help blend the gate with the different terrain features that would be placed next to the gate.

Gate with wire fence.

Gate with low maintained hedge

Gate with stone wall.

Gate with Rural hedges.


Cheers John