CLINK HERE FOR A COMPLETE INDEX TO ITEMS ON THIS BLOG

Sunday 24 November 2019

SCRATCH BUILD TRAIN STATION MDF part 1

Another  MDF scratch build project, this time I constructed a Train station with 2 platforms,one larger than the other both made from 3mm MDF.
These will be feature pieces on one of the gaming tables at CANCON 2020 using the "Swift to Support" scenario from the Blitzkrieg 1940 Chain of Command handbook. 

LARGE TRAIN PLATFORM
This is the large train station Platform with a ramp to one side.

It consists of two building as always I used a hand motor to etch in the detail. 

Rear view of the station with stairs leading up to the entrance.
View of the cardboard tiles in place.
To maximize the use of the building for other gaming purposes ,I decided not to glue down the buildings onto the platform. 
  
Front view 


Rear view


Removable roof.

The door where made from cardboard, etched and a thin layer of superglue was placed over them to make them more ridged.

Small building from the large train platform showing some battle damage.


Removable roof.
  
SMALL TRAIN PLATFORM
Small train platform

Also showing lots of battle damage.

The rain shelter is removable

The smaller building is also removable this time I placed a magnet on the base to secure it in place . As mentioned before I wanted to make the use of the buildings dual purpose. 
Rear view.

Made a ramp for the transfer of larger goods to and fro from the train. 

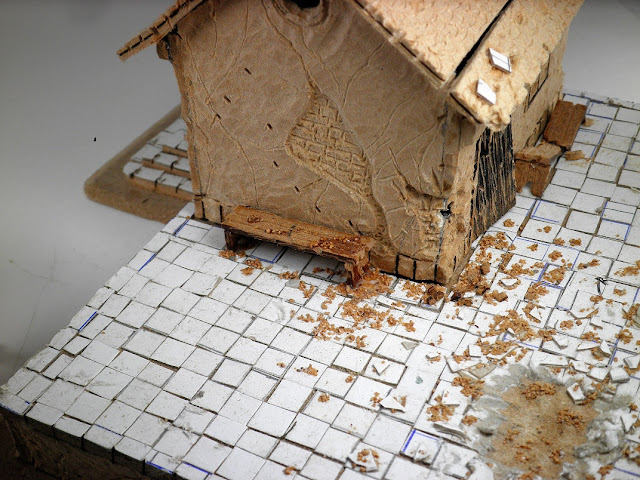
Close view of some of the damage to the floor tiles and walls of the building.


Start of the project making the base. 
Once I constructed the building, I  cut square pieces of cardboard to  simulate tiles for the platforms floor.


Using  a sharp instrument to facilitate the  picking up and placing the pieces of cardboard in place on-top of the PVA glue.
On to painting them.

Cheers John 


Friday 15 November 2019

OUTHOUSE 28mm

A few people have asked me about the outhouse in one the images in my previous picket fence post.
Its from Laser Shark Design which sponsored our last Chain of Command event at CANCON here in Australia.
They are nice little additions to the gaming table and 
in-expense at ($5 AUD,$3.41 USD 2.65 Pound Stirling) for two Outhouses. 
Here are some more examples, there are made from MDF and were very easy to put together.

I replaced one of the roofs on the left with some corrugated paper.

The 2 on the right have been painted straight out of the box , the 2 on the left have been etched with my hand motor before the paint has been applied.

Painting the Outhouse.
Primed with spray can of Black primer.
I applied the paint using a wet painting technique, similar to dry brushing but you load up your brush with more paint and a bit more careful with the application of the paint and opposed to the more rough application when dry brushing.
The base coats used were Vallejo model colour Iquai Sand and Green Grey.
To highlight I added white to the mix to increasing portions and highlighted till I was happy with the results.  

PVA glue was applied to the base and flocked.
Cheers John 

Tuesday 12 November 2019

WOODEN FENCE 28mm

Finally finished my white picket fences, a nice urban addition which adds a bit of character to the gaming table.   

Collection of white fences.

Completed fences

First step in constructing the fences is to cut out strips of 3mm MDF almost 6" long by 2 cm wide. 
 Mark out the mid line.

Next step is to mark out the position of the posts, I used the match length as a guide. 

Purchase a bag of match sticks.
Glue the posts in place with super glue.

The posts on this base will support a gate.  

Add a touch of superglue to the ends of the matches and fix in place, allow to set before attempting the next step.

Apply  PVA glue glue to the base and the supporting struts and position your fence posts.

completed fence

To help line up your fences on the gaming table.
Place one over the other and mark the overlapping area   
pencil line marks the area that needs to be cut away.


The piece of MDF is cut away with box cutters or a hand saw.

Nice match.

Next step,use a sharp pointed instrument to scribe grooves on the matches to create a wood grain and add some small stones. 

Prime the fences with a spray can of Black Primer.

I used VMC Off white or VMC White Grey as a base coat  and use a wet brush technique to add the paint.
You will probably have to apply 2 coats of Off white paint, also allow some of the black primer to remain in the grooves on the posts.
Highlight with VMC Ivory, mostly on the top of the fence and random spots on the rest of the areas.
Don't be afraid to leave small areas with no highlight.

I also added a bit of random green paint on the lower portions of the fence.


The stones were painted VMC desert yellow and highlighted with VMC Iquai sand.

Add PVA glue to the base and add flock.
View of the front and rear of the fence.

To give your fence a bit of character make a couple of them showing signs of ageing and falling apart.

Four, have gate areas.

 made a few short pieces which come in handy.

BEF trooper about to cross the fence.
In Chain of Command rules, this type of fence is classed as a Low obstacle and can be crossed by rolling 2D6 and discarding the lower dice.
Cheers John