CLINK HERE FOR A COMPLETE INDEX TO ITEMS ON THIS BLOG

Sunday, 15 December 2019

FRENCH CIVILIANS 28mm and DRINK CABINET

Took advantage of a  RDO (rostered day off from work ) today to work on more items for CANCON.

The first,  German Shabby Trick Two; Civilians, which will come in play with the "glider landings' scenario. 

For the British, the Drink Cabinet which will be available in "crossing the canal" scenario after a Stuka attack, one of the  bombs lands short of its  target building and uncovers a stash of "Vino". 

These items are specific for early war action from the  Chain of Command Blitzkrieg 1940  handbook.


Painted figures just prior to basing.

The metal figures are from Berlin or Bust miniatures.


Figures super glued on 60 mm plastic base and Milliput added and set aside to dry.

painted the bases.
 
Added the flock.


Completed civilians

My take on the wine cabinet, instead of using a actual cabinet I would have thought the French would have hid their precious wines  by burying them in the garden.
 
First step  make the wooden crates and build up a mount of earth around the crates with plastic sprue  on a plastic base.

Using Milliput build up the earth around the crates.

Make the lids of the crates and roll out wine bottle again using the Milliput .
Once the Milliput is set, super glue all the items and prime with Black Undercoat. Paint  and apply a gloss vanish over the bottles to give them a shine. 


Cheers John 

Saturday, 14 December 2019

A11 MATILDA I and DAIMLER DINGO SCOUT CAR 28mm

Two interesting vehicles I decided to add to my BEF.
The Matilda is like a mobile pillbox with an armour value at 6 at support list 3 and I think the the Dingo is a cool little vehicle. 
Both vehicles are 3D printed and they are my first purchases of  3D printed models, from   OTP Terrain and Resin miniatures.   at a good price with good service.
Please note that the tracks on the Matilda have been positioned back the front.

Just a heads up, that all the images of the Matilda on this post show the mudguards in the wrong postion. This image shows the  correct placement of the mudguards which  should be positioned at the rear of the vehicle tracks. 
Big thanks to SteveJ from the Wargaming Addict who pointed this out to me in the comments section, this image shows the dissecting of the tracks in preparation to switch them over to  the correct position.


The A 11 Matilda I is a lovely printed vehicle and I could have gone straight onto painting it but being me I lightly sanded the vehicle to give it a bit of a rough look.

I also etched into the edge of the track with my hand motor to divide the link between the tank tracks to make it a bit more pronouced.
Better view of the edge of the track that has been slightly modified. 


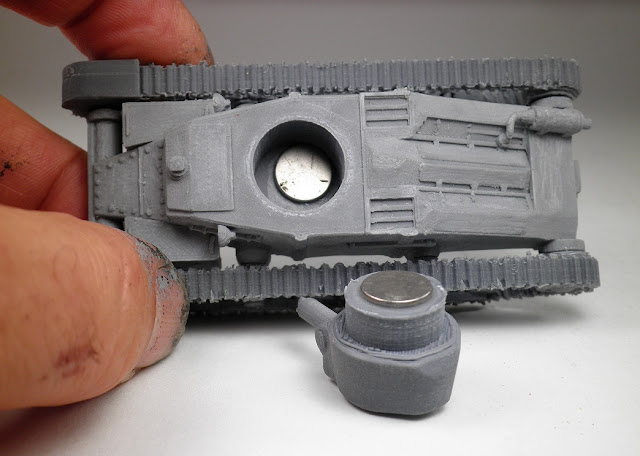
Also added a magnet on the underside of the turret and the base of the vehicle to secure the turret and allow to rotate.
Completed painted vehicle.

I used the same colours and techniques for painting the vehicle as  my other BEF vehicles.


I purchased 2 Dingos, on the left is as supplied, its good enough to go ahead and paint and finish the vehicle but I decided to add a bit more detail using plastic stryene sheets and some odd pieces of plastic sprues.
I also modified the wheels a bit with some etching.

The dingo as supplied.

Dingo with my modifications.


Painted and completed.


I also purchased a Lanchester II Armoured Car  sitting on my  bench for my Australians in Malaysia also from from OTP which is a lovely detailed vehicle that will not need any modifications but I will not be painting  till after CANCON.

Cheers John.