I made this DIY Static grass applicator early last year, in preparation for future Terrain building projects, for the gaming table.
Its also a cheap and ideal option for constructing Tufts for Infantry bases.
On this page I describe:
- How to make a DIY Static grass applicator.
- How to use the applicator to construct Tufts.
- How to use it for general Terrain making.
 |
| Completed static grass tufts for placement on miniature infantry bases |
 |
| DIY Static grass applicator |
 |
| Disassembles to gain access to battery and flock holder |
1. HOW TO MAKE A DIY STATIC GRASS APPLICATOR
 |
Items needed
- Small kitchen strainer
- Small food container with lockable lid
- IONB2 Negative ION Generator Module: maybe purchased for AUD $14.00 from Oatley Electronics at: http://oatleyelectronics.com/product_info.php?products_id=915
- 9 volt connector
- 9 volt battery
- Plastic wire connector
- Push button switch
- led light
- Crocodile clips
- Extra wire
- 2 x Plastic containers (or PVC drain pipe maybe substituted equal to the length of the 2 plastic containers approximately 8 inches in length, and use threaded end caps, found at your local hardware store)
|
 |
- Cut handles off strainer
- Cut a circular hole in the top of the lid of the food container to fit mesh.
- Push the strain thru the inside of the lid and glue into place.
- Glue the lid of the circular container onto the base of the food container.
- Drill 5 holes to allow for 3 x wire access, switch and led placement .
|
 |
| Electrical layout |
2. HOW TO USE THE APPLICATOR TO CONSTRUCT TUFTS
 |
Items needed to produce static grass
- Static grass applicator
- grass flock
- your wife's oven baking paper
- metal biscuit lid
- PVA glue
- green paint
- scissors
|
 |
| Open applicator lid and add flock and lock. |
 |
| Cut wax paper sheet to fit metal lid |
 |
| Clamp crocodile clip onto the rim of the metal container and mix 90:10 ratio of PVA to green paint |
 |
| Use a instrument to apply varies size dots onto the waxed paper |
 |
| Turn applicator on and shake the flock onto the dots. |
 |
| Tufts of grass are formed as the applicator draws the grass upright over the PVA. |
 |
| Remove excess |
 |
| Completed tufts,continue this process until the sheet is completely covered and allow to dry |
 |
| Once dry, tufts are ready to remove off the baking paper as needed |
 |
| Currently working on completing the basing of my British figures, hope to finish them soon. |
3.HOW TO USE THE APPLICATOR TO CONSTRUCT GRASS FIELD
 |
| Follow the same procedure as described in section 2 above with the difference, the crocodile clamp needs to be placed into the terrain board (weather its MDF or Styrene foam) via a pin or very thin nail to complete the electrical circuit. |
 |
| Grass on MDF |
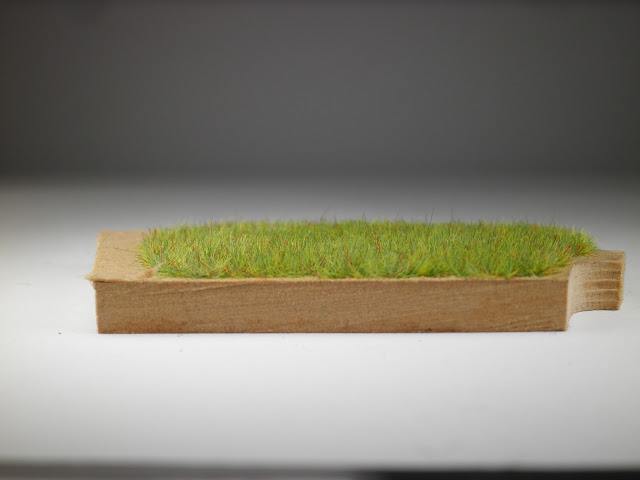 |
| side view |


Bloody genius mate!!! Cannot believe how easy you make it look! Last time I purchased tufts I was stunned at the price so this looks to be a very cost effective option indeed. Right - just need to find a UK stockist of the ion generator module (that sounds so Star Trek! ;o))
ReplyDeleteCheers
Matt
Thanks Matt,Yeah,tempted to say "beam me up Scotty"
Deletecheers.
That's awesome stuff - thanks for sharing! Now to find equivalent pieces here in the US.
ReplyDeleteThanks Robert for your comment
Deletecheers
I'm going to have to give this one a go. I tried making a static grass applicator a couple of years back. It involve soldering..there were many curse words and tears! No soldering makes this a winner!
ReplyDeleteI also like the look of your running Tommy. Do you do that one using the Warlords plastic?
Thanks Aaron for your comments and yes they are Late war British Warlord Plastic, I modified the running Tommy by cutting off his left leg at the knee and re positioning to give a more dynamic look.
Delete(I performed quite a bit of plastic surgery on my British Platoon, hope to post them soon on my Blog)
cheers
I might have to give cutting him up a bit of a try. Somehow I ended up with about 60 of these plastic tommies and even with all the other arm/weapon/head choices there is only so much you can do!
ReplyDeleteOne IONB2 Negative ION Generator Module ordered :)
I agree Aaron,I have cut off some left and right legs,cut off hands and re positioning them to hold a weapon, even trimmed the underside of a boot to make a figure lean forward.
DeleteGood to hear you are on your way to constructing a Static applicator.
cheers and good luck with the models.
Hello thanks for the great share, unfortunately where i'm from I couldn't find the negative ion generator, can it be replaced by the magnet generator?
ReplyDeleteThanks for your comment Unknown, if you do a search on ebay under the heading of 'IONB2 Negative ION Generator Module' you will find there are many available.
ReplyDeletecheers John
Thank you sir for the reply.
ReplyDeleteWhat exactly is the function of the generator? Difficult to find in norway, and i'd like to build the applicator this weekend!
ReplyDeleteIs there a substitute that would also work?