Tried my hand at scratch building 4 x log cabins, log by log, the same way the early Frontier settlers built them, here are the steps I undertook to construct them.
 |
| Log Cabin number 1 with a shade area for the mules and a vegetable garden plot. |
 |
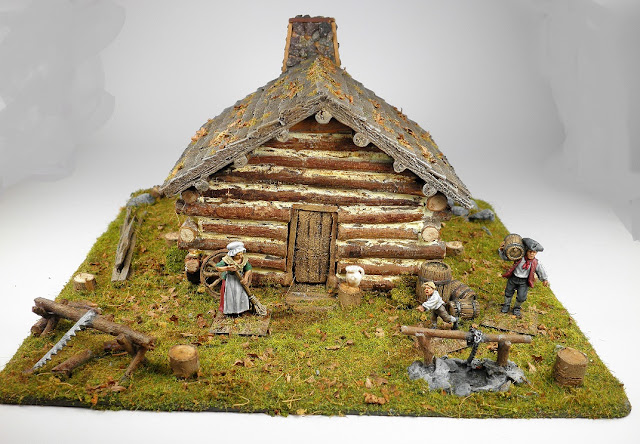
| Log cabin number 2 also with an outdoor cooking area. |
 |
| Log cabin number 3 with a pig pen and clothes line. |
 |
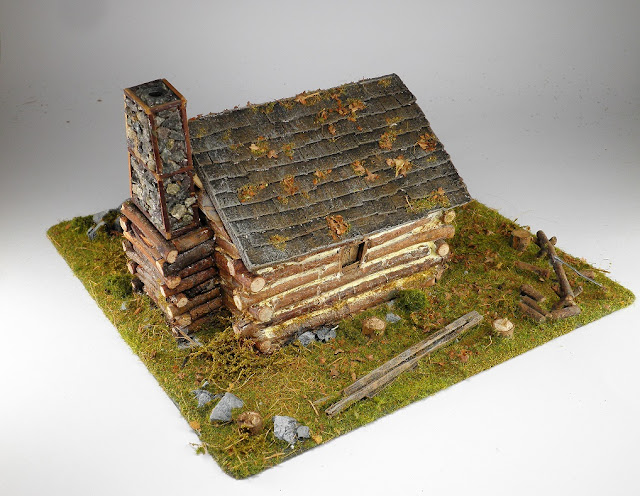
| Log cabin number 4 |
 |
| First step is a trip around the neighborhood parks looking for fallen branches with a suitable thickness to create the logs. |
 |
| I used 3mm MDF as a base plate for the log cabin. |
 |
| I sorted through the branches I collected, looking for and cutting off the straight pieces on the branches with a metal saw ( which has a finer blade). These pieces should be of similar thickness. A Hot glue gun is used to secure each wood piece onto the base and over each wood piece as you build up the walls of the cabin. |
 |
| Course sand paper comes in handy to adjust any wood pieces that may have a bit of a bend in them. |
 |
| Walls almost completed. |
 |
| Optional step but not necessary: If you wish you can slightly hollowed out the overlapping log pieces on the corners of the cabins with a bur on a hand motor or a rounded file to lock them in place. |
 |
| Once all the walls are in position the roof support is built up. |
 |
| To strengthen the roof supporting logs, I drilled a hole into the middle of the logs from the top into the logs right down to the logs that forms the wall of the cabin. I then placed a piece of metal into the hole and secured it in place with superglue. |
 |
| The metal rod is flush with the top log. |
 |
| I marked out the slope of the roof on each side. |
 |
| Used a metal saw to cut off the excess pieces. |
 |
| Used the metal saw to even out the corner log pieces of the cabin. |
 |
| Cabin is ready for the chimney. |
 |
| To construct the chimney, I glue 2 pieces of 3mm MDF together and saw off the edges to create a taper. |
 |
| Secure the MDF in place with Hot Glue gun and used left stripes of MDF from my odds bin to create a wood frame over the chimney, secured in place with super glue. |
 |
| I used small pieces of gravel sourced from a park trail to line the exterior of the chimney. |
 |
| Next step is the roof, I cut out 2 pieces of MDF . |
 |
| I place a beam of PVA glue along one edge of the MDF and secure the other piece of MDF with the first and secure it in place with painters tape and leave over night to dry. |
 |
| Once the PVA glue is dry I removed the roof and cut out triangular pieces of MDF to glue on the under side of the roof. These will support the roof structure, be carful to place these so that they do not interfere with the bottom portion of the cabin when you reposition the roof over the cabin walls. |
 |
| To create the roof covering, I used left over pieces of cardboard from my cobblestone road. Apply a layer of PVA glue with a small brush and place the small squares along the width of the roof. |
 |
| Continue overlaying the cardboard pieces overlapping them as you progress to the top of the roof. |
 |
| Completed tiles on the roof. |
 |
| I used the edge of the hobby knife to add a bit of texture to some of the tiles. |
 |
| Added a couple of wood pieces on the underside of the front portion of the roof and trimmed off the excess with a saw. |
 |
| Use a wood file to even out the windows and doorway. |
 |
| Raided the odds and bits bin for some stripes of MDF used to make a frame for the doorway. |
 |
| Used Balsa wood to create a door and shutters for the window. |
 |
| Textured the Balsa with the edge of the hobby knife. |
 |
| Two of the Four cabins ready for basing. |
 |
| Secured the cabins on a 3mm MDF base with PVA glue. |
 |
| Started to add terrain pieces the base, such as small garden plot, tree stumps, fire place, saw, barrels, rocks, shade for farm animals etc. |
 |
| Once all the bits have been added, I applied thin layer of caulking to create a bit of texture to the base. |
 |
| Once dry, paint the base then paint the other scatter terrain added. |
 |
| Finally, add the flock. |
 |
| I went a step further with this building by adding the texture in between the logs used to insult and plug up any tiny gaps between the logs. |
 |
| The saw was made from cardboard and thin layer of glue applied to the surface to make it ridged. |
 |
| After viewing a number of images of early frontier cabins, I notice that quite a few tree stumps were present around the cleared area near the cabins so I added a few to my cabin bases. |
 |
| All the roofs can be removed to place figures within the cabin. |
 |
| Farmer contemplating the days work ahead of him. |
 |
| The cabins could also pass off as Russian farm houses for WW2 tables (if your not a rivet counter) 😉 |
Cheers John


Absolutely brilliant John! So clever and quite beautiful.
ReplyDeleteFrank
Thank you Frank
Deletecheers John
Astoundingly good!! Really authentic looking too. A joy to game over no doubt.
ReplyDeleteCheers
Matt
Thanks Matt
Deletecheers JOhn
This is beautiful and inspiring. I wish I had the patience and skills to try it out myself.
ReplyDeleteThank you Unknown for your comments
Deletecheers JOhn
Great work John, I think they're generic enough to pass for either USA or Russia, been wanting to try some of this style cabin myself so I may steal your ideas :)
ReplyDeleteKym
Thanks for your comments and you are more than welcome to steal ideas.
Deletecheers John
I like how, to build a miniature log cabin, you built a cabin out of miniature logs.
ReplyDeleteBrilliant as always.
Thank you corvusboreus for your comments
Deletecheers John
Excellent work as always, John. I love your attention to detail... ;D
ReplyDeleteThanks Mark for your comments
Deletecheers JOhn
Excellent stuff as normal. Love the chimney but it must add a wee bit of weight to it ....? and love the cardboard roofing (I did this on a few occasions myself) - but its the outside area that really puts it into place and sells the story great stuff -the wood piles etc.
ReplyDeleteIf I had a garden and enough hot glue I would try one full size LOL. Great stuff
Thanks Glasgow Warhog for your comments, LOL for the full size cabin.
Deletecheers John
And I have to also say - "you just cannot get that natural log look from anything else but natural wood..." very cool
ReplyDeleteAgree Glasgow Warhog
DeleteWonderful scratch building as always John and good to see you have gone green with your use of materials.
ReplyDeleteThanks Pat for your comments more brown that green :-)
Deletecheers John
Another lovely build John - as ever you make the process sound simple while getting fabulous results. Thanks for sharing!
ReplyDeleteThank you Paul
Deletecheers John