The walls are classed as:
Major obstacles (over chest height of a man)
 |
Image of Terrain, one of four gaming tables I made for Cancon 2017, here my Brits are hugging the high walls advancing towards the enemy's base line while Matthew's Panzer Grenadiers are trying stop me (Scenario 2 The Probe)
I eventually made it but Matthew did put up strong resistants .
|
 |
Infantry may climb over the wall but must be adjacent to the wall at the start of the Phase they declare their intentions of "climbing over the wall".
They are then placed immediately on the other side of the wall during the Phase they declared "to climb".
This counts as normal movement and the troops may not perform any other action.
|
 |
A Crusader AA Mk II smashes thru the wall
The lower dice is discarded, leaving the higher dice for the vehicle to reach and smash thru the wall.
While attempting the task, if doubles are rolled the vehicle is Temporally Immobilised.
In the following Phases it may attempt to free itself by Activating the Driver and rolling 1D6.
On a roll of:
5-6 its free and moves the number rolled in inches.
1 it becomes permanently Immobilised.
A Temporary or Permanently Immobilised vehicle will Double any Shock it suffers in subsequent Phases.
|
 |
| Break in the wall caused by a tracked vehicle allows Infantry to freely move thru the wall. |
 |
| Troops venting thru the large gate and door. |
 |
| Hole in the wall gives access but also provides hard cover for a firing position. |

 |
| Using 6mm MDF cut strips 4.5cm x 30cm |
 |
Using a Dremel type hand grinder in conjunction with a circular bur start to run the bur up and down in a circular motion to to give the wall a bit of texture. Also go over the top of the wall .
|
 |
| Continue grinding in cracks in the wall and detail exposed stones,finally using a disc cut into the top of the wall and sides to create flat stones. |
 |
 |
| Measure and cut 3mm MDF for bases 3.5cm x 30cm. |
 |
| Make a the middle of the base on both ends, place PVA glue on the bottom of the wall and glue in place. |
 |
| Allow to dry be careful the walls are placed at right angles to the base and not leaning over. |
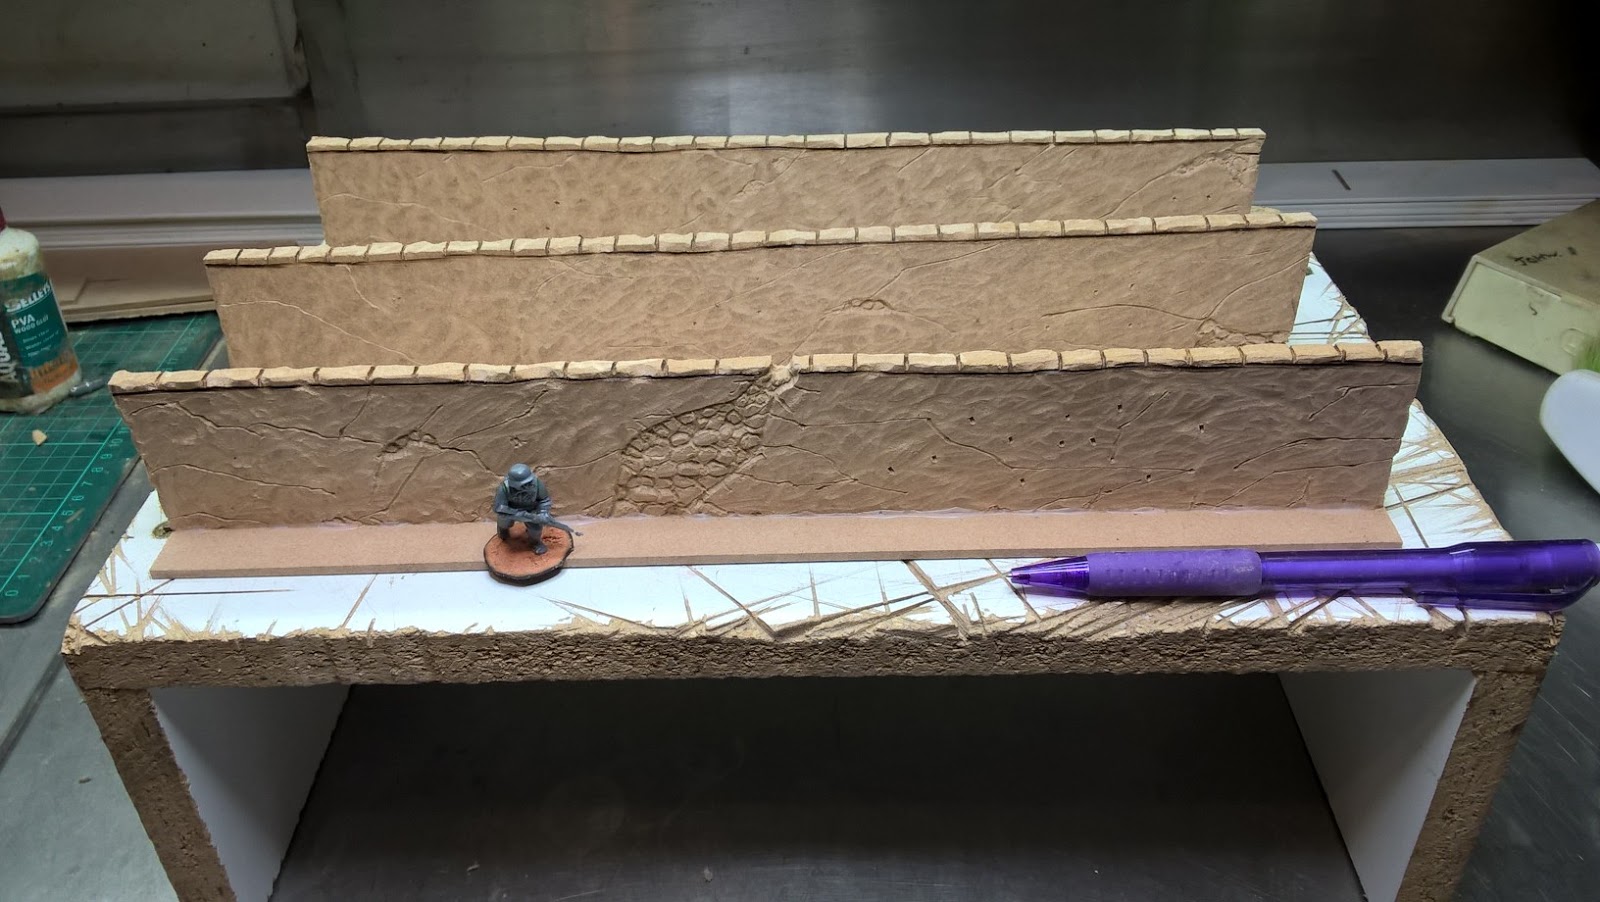 |
| trooper placed for scale |
 |
| Use a Mitre box and hand saw to cut the sections in half ,cut into the base to give it a irregular shape with box cutters. |
 |
| Using PVA add some rocks. |
 |
| Clink on : low stone walls for more info on base design. |
 |
| Undercoat the walls with Black Primer and paint the walls with Vallejo Model Colour 886 Green Grey,2 coats are required. |
 |
| Using a 50:50 mix of Stone Grey and Green Grey to dry brush the walls |
 |
| Using a 50:50 mix of Green Grey and Iraqui Sand dry brush selected parts of the wall. |
 |
| Using a 50:50 mix of off white and Green Grey paint select parts of the wall, you can increase the portion of Off white to suit . |
 |
Light highlight with Stone wall grey to the lighter areas only.
Paint the top of the walls with Carne Marron Tan and very lightly dry brush them with a 50;50 mix of Carne Marron Tan and Stonewall Grey.
Exposed stones in the wall are painted with Stone wall grey.
Finally use Oliver Grey to paint the green running from top to bottom in 2 or 3 places on the wall.(this will be the areas to add Woodland Green Blend in conjunction with PVA glue)
|
 |
| Brush on PVA glue to the base and flock. |
 |
| I constructed a number of walls,2 x breached walls and a gate. |
These look great John, I missed them at CanCon too busy playing in another tourney. I would have really liked to have had a look over the CoC game.
ReplyDeleteThanks Chris,
DeleteNo worries there is always Cancon 2018,Bart wants to make it a D Day theme.
You might want to join in!
cheers John
Very good indeed John! Lovely looking terrain :o)
ReplyDeleteThanks Matt,I have picked up a few ideas from your blog for my building hope to post pictures up in the not too distant future.
Deletecheers Johm
Stunning, meticulous work as usual, John!
ReplyDeleteThanks Andy and thanks for answering all my questions on the forum, its a big help.
Deletecheers John
Impressive! Thank you very much for the step by step.
ReplyDeleteThanks Moiterei for your comments, your blog is very inspirational.
Deletecheers John
Wonderful to look at, well worth making!
ReplyDeleteThanks Bart,hope you are well.
Deletecheers John
terrific, saw your post on The Guild and popped over. Had 2 questions - when you dremel the top stones, how do you get them to look like they slightly are wider than the wall? do you add something to give them bulk? and what do you use to etch the internal stones?
ReplyDeletethanks for a terrific tutorial!
Thanks weezer1 for your commets,
ReplyDelete"Question:when you dremel the top stones, how do you get them to look like they slightly are wider than the wall? "
I have added more text to the pictures above but while I am using the circular motion to grind in the texture on the face of the wall, I also go over the top.
I then use a disc on a mandrel (picture added above ) to scribe in even line just below the top of the wall, then I section the top to create the individual stones.
"and what do you use to etch the internal stones?" I think I used box cutter to cut into the surface and then switched to a metal bur called a "fissure bur" but you can use any type of thin shaped grinding bur to detail the rocks.
Hope this helps
cheers John
thanks so much John, that was very helpful and I think I'm gonna give it a shot!! your buildings also look amazing, really well thought out and different!
DeleteCreative and wonderful job, beautiful pieces of terrain, congrats!
ReplyDeleteMany thanks Phil for your comment.
Deletecheers JOhn
You have a great talent for terrain building, up there with your figure conversion and painting. Look forward to seeing your river sections.
ReplyDeleteThanks Pat for your comment, I draw a lot of inspiration from your work
Deletecheers John
Those are fantastic John, any table would be graced with your terrain I feel.
ReplyDeleteHow long did this process take you on this set of walls? Looks like the cutting and dremel work alone would be hours?
HI Dai, thanks for your comment,Initially it always takes a while to work out how to create the walls and detail them and then work out what paint colours to use.
DeleteNow that I know how to make them it does take that long to whip some up, I am currently in the process of making up 4 walls with doors and a couple more with blasted holes.
cheers John
I you are going to try making some, try grinding MDF outdoors and wear a good mask as it can get very dusty.
Very impressive, I needed a good step by step guide for making walls.
ReplyDeleteGood to hear.
Deletecheers John
Great looking terrain John
ReplyDeleteThanks rross
Deletecheers JOhn
Great tutorial, here. I used it as the base for making m own walls recently- different materials, but still very similar. All credit due was given on my blog. Many thanks for providing the inspiration... :)
ReplyDeleteThanks Mark for your comments and great to hear this article has been helpful in creating your own walls.
Deletecheers John