Here is a brief history of my never ending battle with marker upgrades for Chain of Command, (something Mark 'Tactical Painter' can relate to)
In Chain of Command Hits on Leaders are treated differently than Hits on normal troopers. When a Leader has rolled for a positive Hit, a D6 roll determines what damage he suffers, on a roll of :
1 Killed
2-3 Wounded and cannot be activated for the remainder of that Game Turn.
4-6 Lightly Wounded, the number of Command Initiatives are reduced by 1.
So basically Leaders have 2 types of Wounds those that deactivate a Leader for a game turn after which the Leader can be reactivated and those which allow the Leader to continue to be activated but with a reduction in Command Initiatives.
LIGHT WOUNDS 2-3 roll
Leader is Wounded but can still operate with a reduction of Command Initiatives
 |
Here are the four types of Light wound markers I have developed and used over the years while playing CoC. |
 |
Before I continue talking about wound markers, I will just note what base shapes I use to identify what the miniature represents on the gaming table.
|
Light Wound Markers - 1st Attempt |
These markers were my first attempt at Lightly wounded Markers for Leaders . They are small beads with a -1 on one side and a thin metal sheet glued on the bottom.
|
 |
Most of my early miniatures where based on magnetic sheets and overlaid with Milliput to create a textured surface. All the Leaders have tiny earth magnets glued on the surface of the base prior to the addition of Milliput, Senior Leaders have 2 magnets while Junior Leaders have 1 magnet which provided the anchoring points for the markers. |
 |
| The Late War British Senior Leader has suffered 2 wounds while the Junior Leader has suffered 1 wound reducing their Command Initiatives. |
 |
| First step to constructing these markers is to glue the bead onto a small piece of Evergreen Plastic sheet. |
 |
| Cut a small thin piece of metal sheet and glue it to the other side of the bead with superglue. |
 |
| Use a hobby knife to trim off the excess. |
 |
| Chamfer the edges with a hobby file |
 |
Paint on the -1 with some Vallejo Model Colour Paint and coat them with a Matt clear varnish.
I originally made all these makers in preparation for gaming IABSM before Chain of Command rule set appeared and decided to adapt the -1 marker for Light wounds in CoC. |
Light Wound Markers - 2nd Attempt
 |
| The -1 on the Wound markers were a big plus when I first started learning CoC, it did help, remind me to reduced the Leaders Command Initiative but as I become more familiar with the rule I replaced the -1 with a red cross and started using these as my Wound markers. |
Light Wound Markers- 3rd Attempt
 |
| The big plus using Beads was the ease of handling them but the down side was they looked a bit too bulky on the gaming table so I decide to move to a lower profile marker in the form of a red cross. |
 |
| Both the Senior Leader and the Junior Leader are down to one Command Initiative. |
HOW I made the CROSSES.
 |
| The crosses are made from Warlord games plastic bases. First step is to scribe in the outline of the crosses |
 |
| Use a very sharp hobby knife to cut out the cross. |
 |
| You should be able to get 4 crosses from each base. |
 |
| As I am using magnets on the Leaders bases, I needed to add some sort of metal on the cross underside to establish a bond so I choose the humble paper clip. |
 |
| Two pieces of paper clip are secured in place with superglue. |
 |
| Top side of the cross |
 |
| Primed and coated with a couple of layers of Tamiya XF-7 paint. |
Light Wound Markers - 4th Attempt (and hopefully the finial)
 |
| As I now have moved away from using Magnet sheets for my bases and adopted thin metal bases, I had to make some new Light wound markers, ones with tiny earth magnets embedded in them. |
 |
| I used the same procedure to make the crosses from plastic bases with one difference I drilled circular holes on one side and superglued tiny earth magnets. |
 |
| Primed and coated with Tamiya XF-7 paint, two have been flipped over to reveal the magnets. |
 |
| Japanese Leaders from my current project are based on metal sheets with a layer of Mulliput applied. |
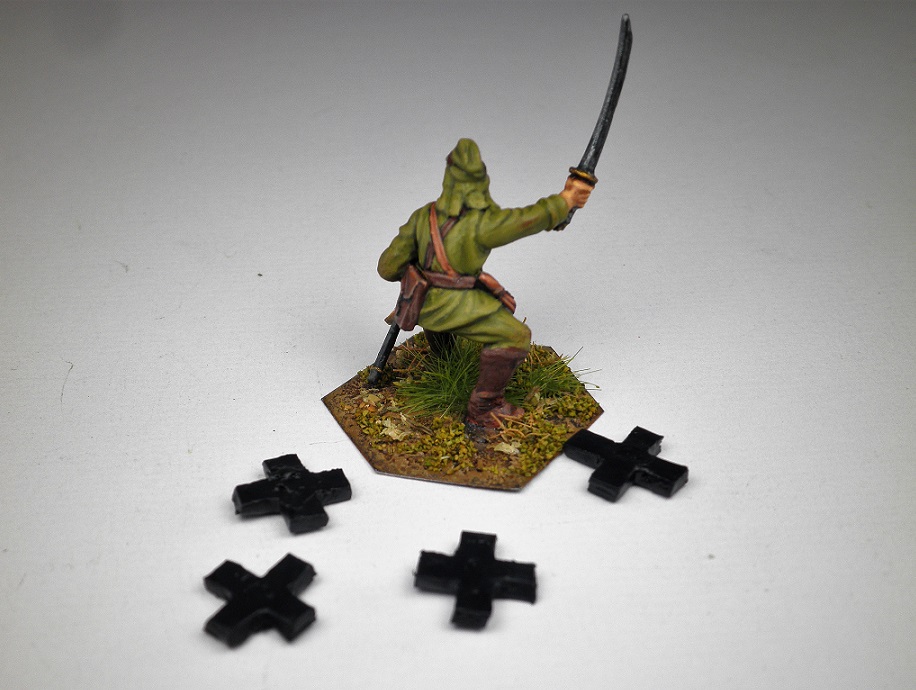
WOUNDED 4-6 roll
Leader does not lose any Command Initiatives but cannot be Activated in the current game Turn.
 |
The flipped over Leader on the left would be used to represent a Leader that had rolled a 4-6 and cannot operate in the current game Turn. I have since move to using a black cross to signify that this Leader cannot be activated in the game Turn. |
 |
| The crosses are made the same way as mentioned above but have been painted black. |
 |
| They also have tiny earth magnets embedding to adhere to the metal base of the Leader. |
CHEERS JOHN


All good ideas John, thanks for sharing.
ReplyDeleteThanks Kym for your comment
Deletecheers John